How to create a Jira ticket
To create a Jira ticket, press C anywhere in Jira or select the Create button in the top navigation bar, pick the space and work type, give it a summary, and select Create. The whole thing takes about ten seconds once you know where the work belongs.
Two things make older guides confusing here. Jira Cloud now says space where it used to say project and work item where it used to say issue, and the create dialog itself was replaced with the summer 2026 Jira release. Both are covered below, with a full old-to-new glossary.
Step by step
- Open the create dialog. Press C from almost any screen, or select the Create button at the top of the page.
- Check the space and the work type. They sit as two chips in the header of the dialog and come preselected from wherever you pressed Create, so most of the time you can leave them alone. Select a chip to change it. Space is what Jira called a project until late 2025, and work type is the old issue type.
- Write the summary in the title line at the top. This is the one line that shows up in every board, filter and report, so write it as a sentence someone else can act on.
- Fill in the fields below it, and any that Jira marks as required.
- Select Create.
Tick Create another before saving if you have several tickets to file in the same space and work type. The dialog stays open with those two settings kept.
Ticket, issue, work item: all the same thing
If the guide you are following says something different from what you see on screen, this is usually why. Atlassian renamed most of the vocabulary in Jira Cloud between 2024 and 2026, and older documentation still uses the old words.
| What it was called | What Jira Cloud calls it now | Where the old name still applies |
|---|---|---|
| Issue | Work item | JQL, the REST API, Jira Data Center |
| Project | Space | JQL project, automation smart values {{project}}, the REST API, Data Center |
| Issue type | Work type | JQL issuetype |
| Project role | Space role | The REST API |
| Browse Projects (permission) | Browse spaces | |
| Create Issues (permission) | Create work items |
The projects-to-spaces change reached Free and Standard plans on 28 September 2025 and Premium and Enterprise from 20 October 2025. The issue-to-work-item change rolled out in stages before that.
None of it changed how Jira behaves. Fields, workflows, permissions, space keys and work item IDs all stayed as they were, and every existing filter, saved search and integration kept working. Atlassian has said a space alias will be added to JQL, but project continues to work.
Nobody at Atlassian ever called any of it a ticket. Most teams do, and support teams coming from a help desk background always will. Work item, issue and ticket all mean the same record. Our article on what a Jira issue or ticket actually is covers the concept itself.
What the create dialog looks like now
The create dialog now opens in a compact mode by default, and it looks nothing like the old one. A header line carries the space key and the work type as two chips. Below it, Summary is the title line rather than a labelled input, the description doubles as a prompt for slash commands and Rovo actions, and the fields follow as a short list with icons: Status, Due date, Assignee, Priority and whatever else your admin has promoted.
An earlier preview of this dialog relabelled Summary as Title. That change did not ship, so the field is still Summary, in the interface as well as in JQL and the REST API.
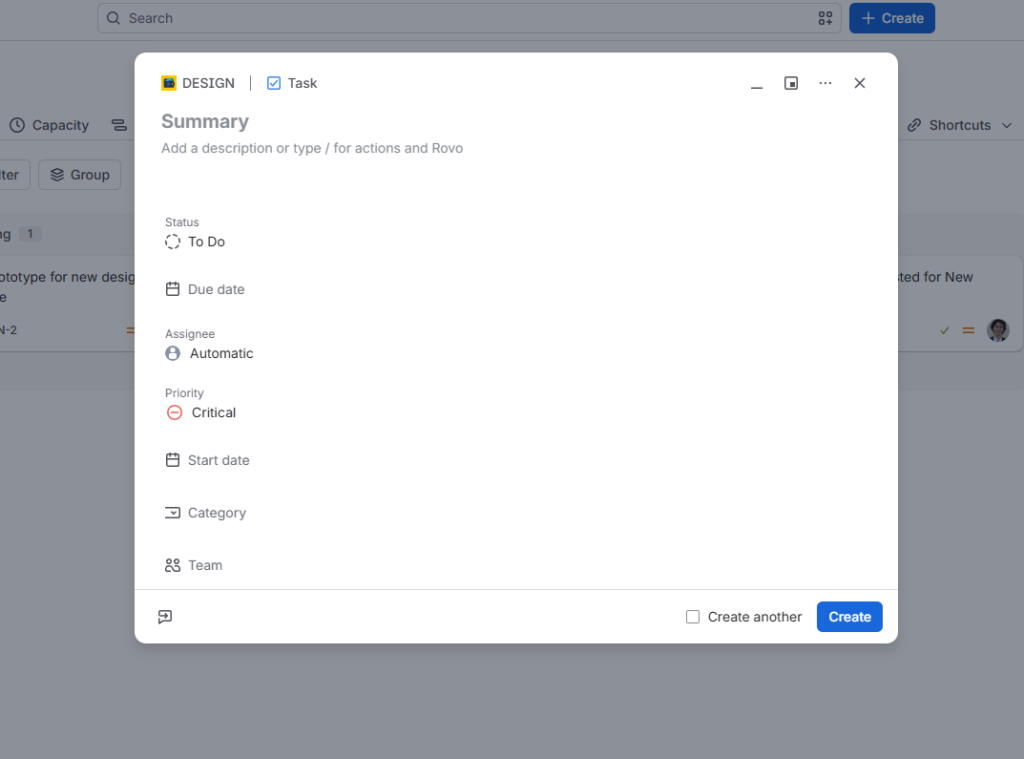
The create dialog after the summer 2026 release. Space key and work type sit in the header, and Create another is a checkbox next to the Create button.
Where your admin has configured required fields, they appear above a divider under a Required heading, so you can see at a glance what has to be filled in before Create will do anything.
The dialog can be docked to the bottom right corner, so you can keep working while you fill it in, and the diagonal arrow expands it back to the full window. Use whichever is more comfortable.
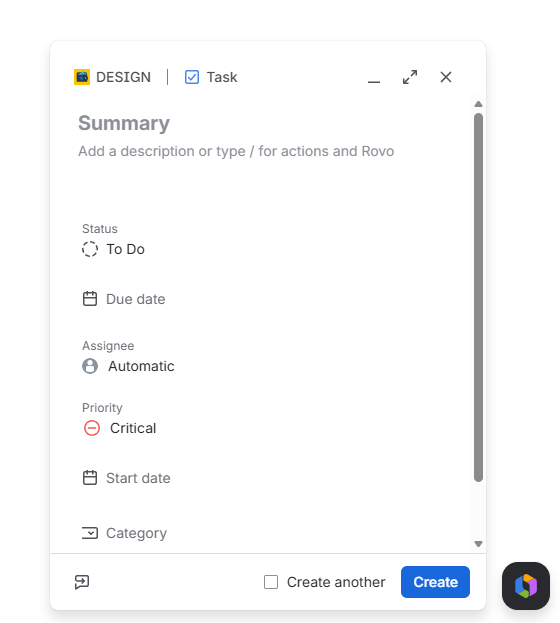
Which fields appear is not something you control from the dialog. It comes from the create screen assigned to that space and work type, which is why the same Bug looks different in two spaces, and why Status or Team show up in some of them and not in others. See what Jira screens are if the field list is not what you expect.
Site admins can turn the compact mode off for the whole site under Settings > System > General Configurations by switching Simple Create as Default to off.
The fields you will meet
| Field | What it does |
|---|---|
| Space (formerly project) | Decides the workflow, the permissions and the ticket key. The one choice that is awkward to change later. |
| Work type (formerly issue type) | Task, Bug, Story, Epic and anything your admin added. Drives which fields and which workflow apply. |
| Summary | The one-line name. Shown in boards, search results and notifications. Still summary in JQL and the REST API. |
| Description | The detail. Supports formatting, images, tables and slash commands. |
| Assignee | Who owns it. Can be left empty and picked up later. |
| Priority, labels, components | Optional in most setups, and the fields teams most often make required. |
Beyond those, everything is a custom field your admin has configured. Our overview of Jira system fields and their meaning explains the built-in ones.
Other ways to create a ticket
- From a board or backlog. Use the inline + Create at the bottom of a column or list. It creates the ticket in that space with a summary only, which is the fastest way to capture something during a stand-up.
- As a subtask. Open the parent, select Add or create related work under its summary, then Create subtask in a company-managed space or Add a child work item in a team-managed one. Subtasks inherit the space, security level and sprint from the parent. Atlassian now uses subtask and child work item for the same thing. See when to use subtasks.
- From Confluence. Highlight text on a page and turn it into a ticket without leaving the document. We cover this in creating Jira tickets directly in Confluence.
- By email or a service desk portal, if your team runs Jira Service Management. Customers never see the create dialog at all.
When Create does not work
No Create button. You need the Create work items permission, still called Create Issues in older documentation, in at least one space. If you have just been added to a team, the permission may not be in place yet. Which Jira permissions are there lists what to ask for.
The space is missing from the list. Same cause. The dropdown only shows spaces where you can create.
A required field has no value you can pick. The field has a context that does not cover this space, or its options were disabled. That is an admin fix, not something you can work around from the dialog.
Pressing C does nothing. The shortcut is ignored while the cursor is in a text field. Click on empty space first.
Frequently asked questions
Can I change the space after creating a ticket? You can move it, and links to the old key redirect to the new one. You will be asked to map statuses, and field values can be dropped where the target space is configured differently. Moving between a team-managed and a company-managed space also loses story point estimates, because the two use different fields for them, and space report data does not travel either. Pick the right space up front where you can.
Who can see the ticket I just created? Anyone with the Browse spaces permission, formerly Browse Projects, on that space, unless a work item security level applies. Creating a ticket does not make it private.
How do I create several tickets at once? Use Create another for a handful. For more than that, use the CSV importer at Settings > System > External system import, which is also how most teams bring a backlog in. It normally needs admin rights, and users without them are capped at 250 work items per file.
Do I have to fill in the description? Only if your admin made it required. It is usually worth it anyway, because a summary alone rarely survives contact with the person who picks the ticket up three weeks later.
Once the ticket exists, you will probably want to link it to related work, add watchers or share it with someone.