We have merged our Atlassian licensing and consulting business with our partners over at Seibert Group. The Actonic apps will continue to be developed by the same caring team as before.

How to Use Jira for Project Management in 2023


5
(4)

Collecting and organizing various stakeholder requirements, keeping an eye on the budget, identifying risks early on and managing resources: Project management is no walk in the park. As a project manager, you know this all too well and are looking for a powerful tool to help you successfully complete your projects. Atlassian's Jira is used by many companies worldwide to efficiently plan, implement and monitor projects. But how do you use Jira in project management? What is Jira exactly? What are its advantages? And is the tool also something for you and your team?

Let's find out!

Claim your free consulting session

Unfold your Jira potential with our tailor-made solutions.

Request consultation

What exactly is project management?

To understand how exactly Jira can help with the day-to-day challenges of project management, we first need to clarify what exactly project management means.

In a nutshell, project management describes the process of ensuring that everything needed to achieve the project goal comes together in a coordinated manner. In this context, project management includes aspects such as time, scope, and budget. These are planned, controlled and monitored during the project period. One of the immense challenges of project management is to keep these three facets (time, scope, cost) in balance. This is why these three components are called the “magic triangle of project management.”

But what exactly is being managed here?

What is a “project”?

A project is a one-time task that meets the following conditions:

  • is limited in time

  • pursues a specific goal

  • is new and unique

  • can be accomplished with limited resources

The success of a project stands and falls with efficient project management. However, some stumbling blocks are almost pre-programmed and the daily challenges can hardly be mastered without smart tools.

Challenges of project management

To evaluate how to use Jira in project management, let’s first look at the stumbling blocks in project management.

  • Time management

    • Using time productively and efficiently (within a team) is one of the greatest challenges of project management. Setting realistic timeframes and avoiding delays can be difficult, as some aspects are hard to calculate.


  • Budget control

    • Sustainable budget monitoring and management can be challenging, especially when unforeseen events occur. For example, delays, changes in the scope of the project, or rising material costs often cause problems if an agile project management tool is not in place.


  • Team communication

    • The competence to communicate fruitfully with team members and to motivate them is of crucial importance of any project success. Only if all team members understand the tasks and overall vision, their performance will be profitable.


  • Resource management

    • As a project manager, you must ensure that all necessary resources, including personnel, materials, and technology, are available and properly deployed during all phases of the project.


  • Risk management

    • Spontaneous failure of technology or infrastructure, delay in material delivery, or communication problems: As a project manager, you must be able to identify risks and develop effective strategies to minimize or eliminate them.


  • Change management

    • If a trigger of one of the risks just mentioned occurs, you need to adjust the magic triangle of project management and modify the project scope, budget and/or timeline. To do this, you need a transparent overview of all the tasks that still need to be completed.

Having painted the devil(s) on the wall and facing again how difficile project management is, let’s take a look at how the popular project management tool Jira can help overcome these challenges. Before we do that, however, we’ll clarify the question of all questions: What exactly is Jira?

What is Jira?

In-depth explanations of Jira, its elements and reasons for its worldwide popularity, basically fill an article with their own. Specifically, this one: What is Jira, and why use it?

But even at this point, we want to avoid leaving you completely in the dark. One thing up front: when we talk about Jira in this article, we mean “Jira Software”. Originally, Jira Software was developed by the Australian company Atlassian in 2002 to help software teams with bug tracking. But the versatile task management tool is also great for agile teams for scrum management, software development, professional service management, marketing, content management, and of course, project management. Over 65,000 organizations worldwide, including major companies such as Spotify, eBay and Airbnb, use Jira software. According to Digital.ai‘s latest annual State of Agile report, Jira is the undisputed number one agile project management tool.

Although there are similar variants such as Jira Service Management, Jira Align, and Jira Work Management, the unprecedented popularity of Jira Software has made “Jira” a quasi-synonym for “Jira Software.”

For simplicity, we will also use the short form “Jira” in this article.

The most important functions of Jira

Basic features like fields are explained here: the most important elements of Jira. In this section, we will primarily take a look at those functions that are essential for project management.

Projects in Jira

Bingo! In Jira, you can easily create projects. This lays the foundation for successful project management. As in real life, Jira projects are a collection of tasks, improvement suggestions or requirements. Each project in Jira has a unique description and ID, which helps to find the right project quickly. Projects in Jira can be managed by one or more teams (team-managed) or the company itself (company managed).

Issues/Tasks

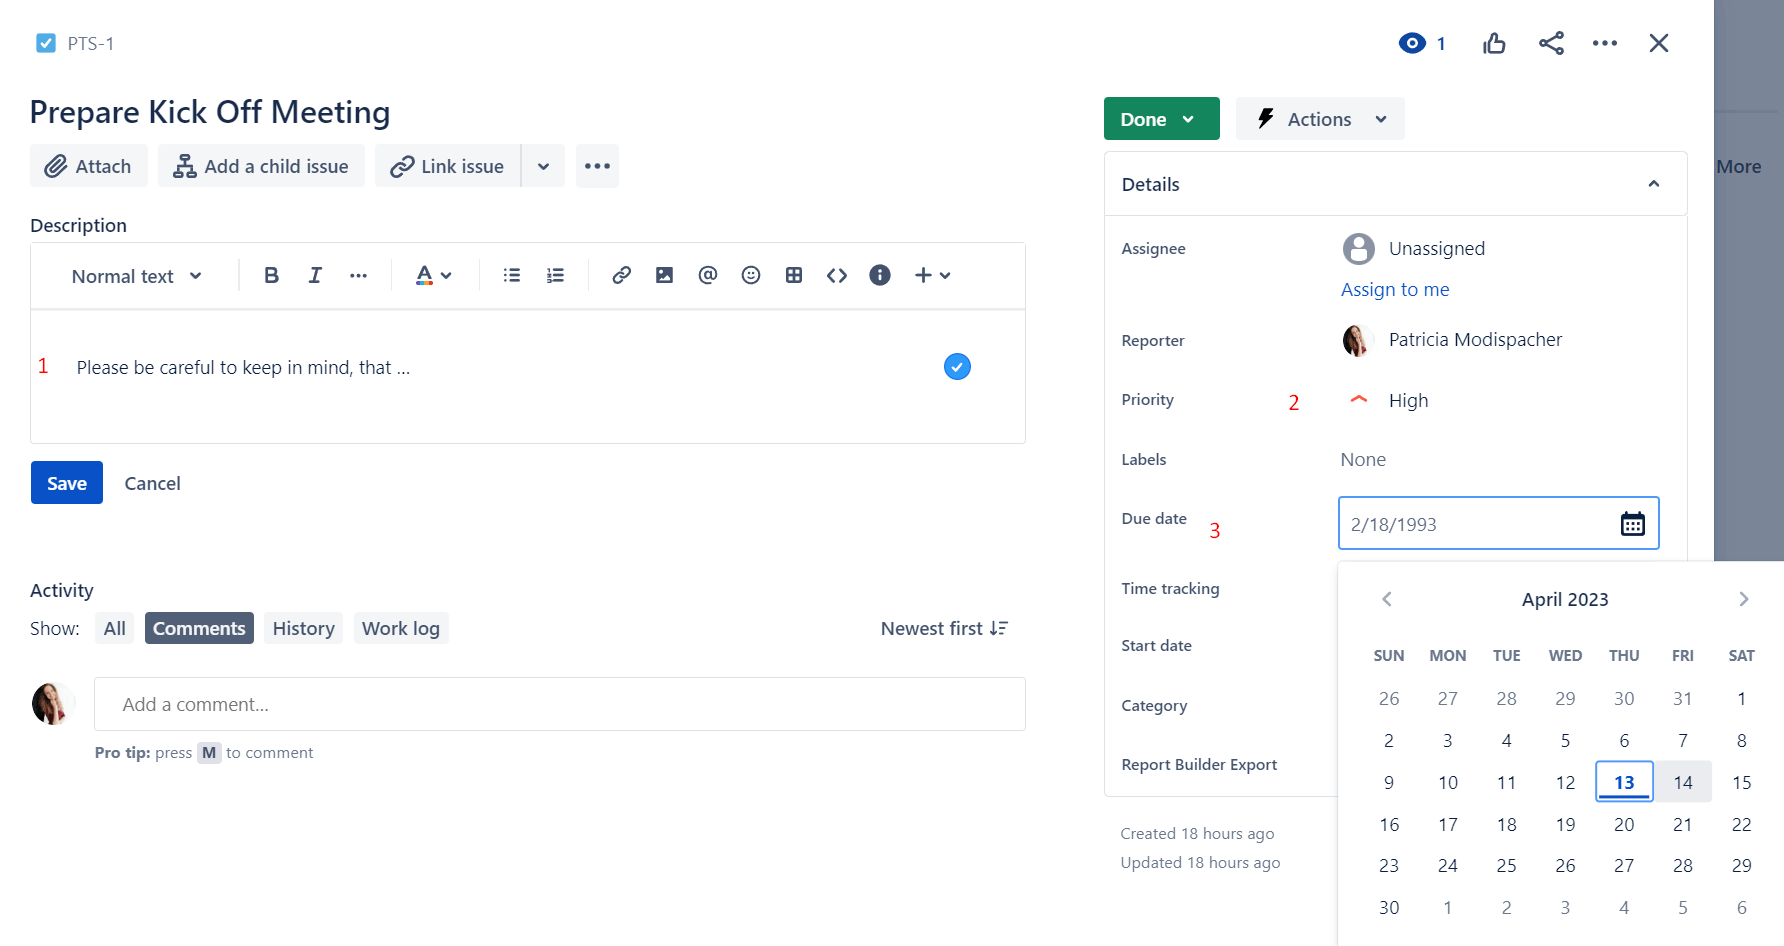
In a Jira project, you can create tasks as issues and assign them to your team members. For example, you create the task/issue: “Plan kick-off meeting” and assign it to Linda. Enter a detailed description (1), set the priority high (2) and add a deadline (3) so Linda is aware of everything.

Jira Project Management Templates

Every beginning is hard. That’s why Jira has built-in project templates to help you get started. Among them is a template for project management. This has been specially developed for the demanding challenges of project management and ideally supports you in all five phases of project management.

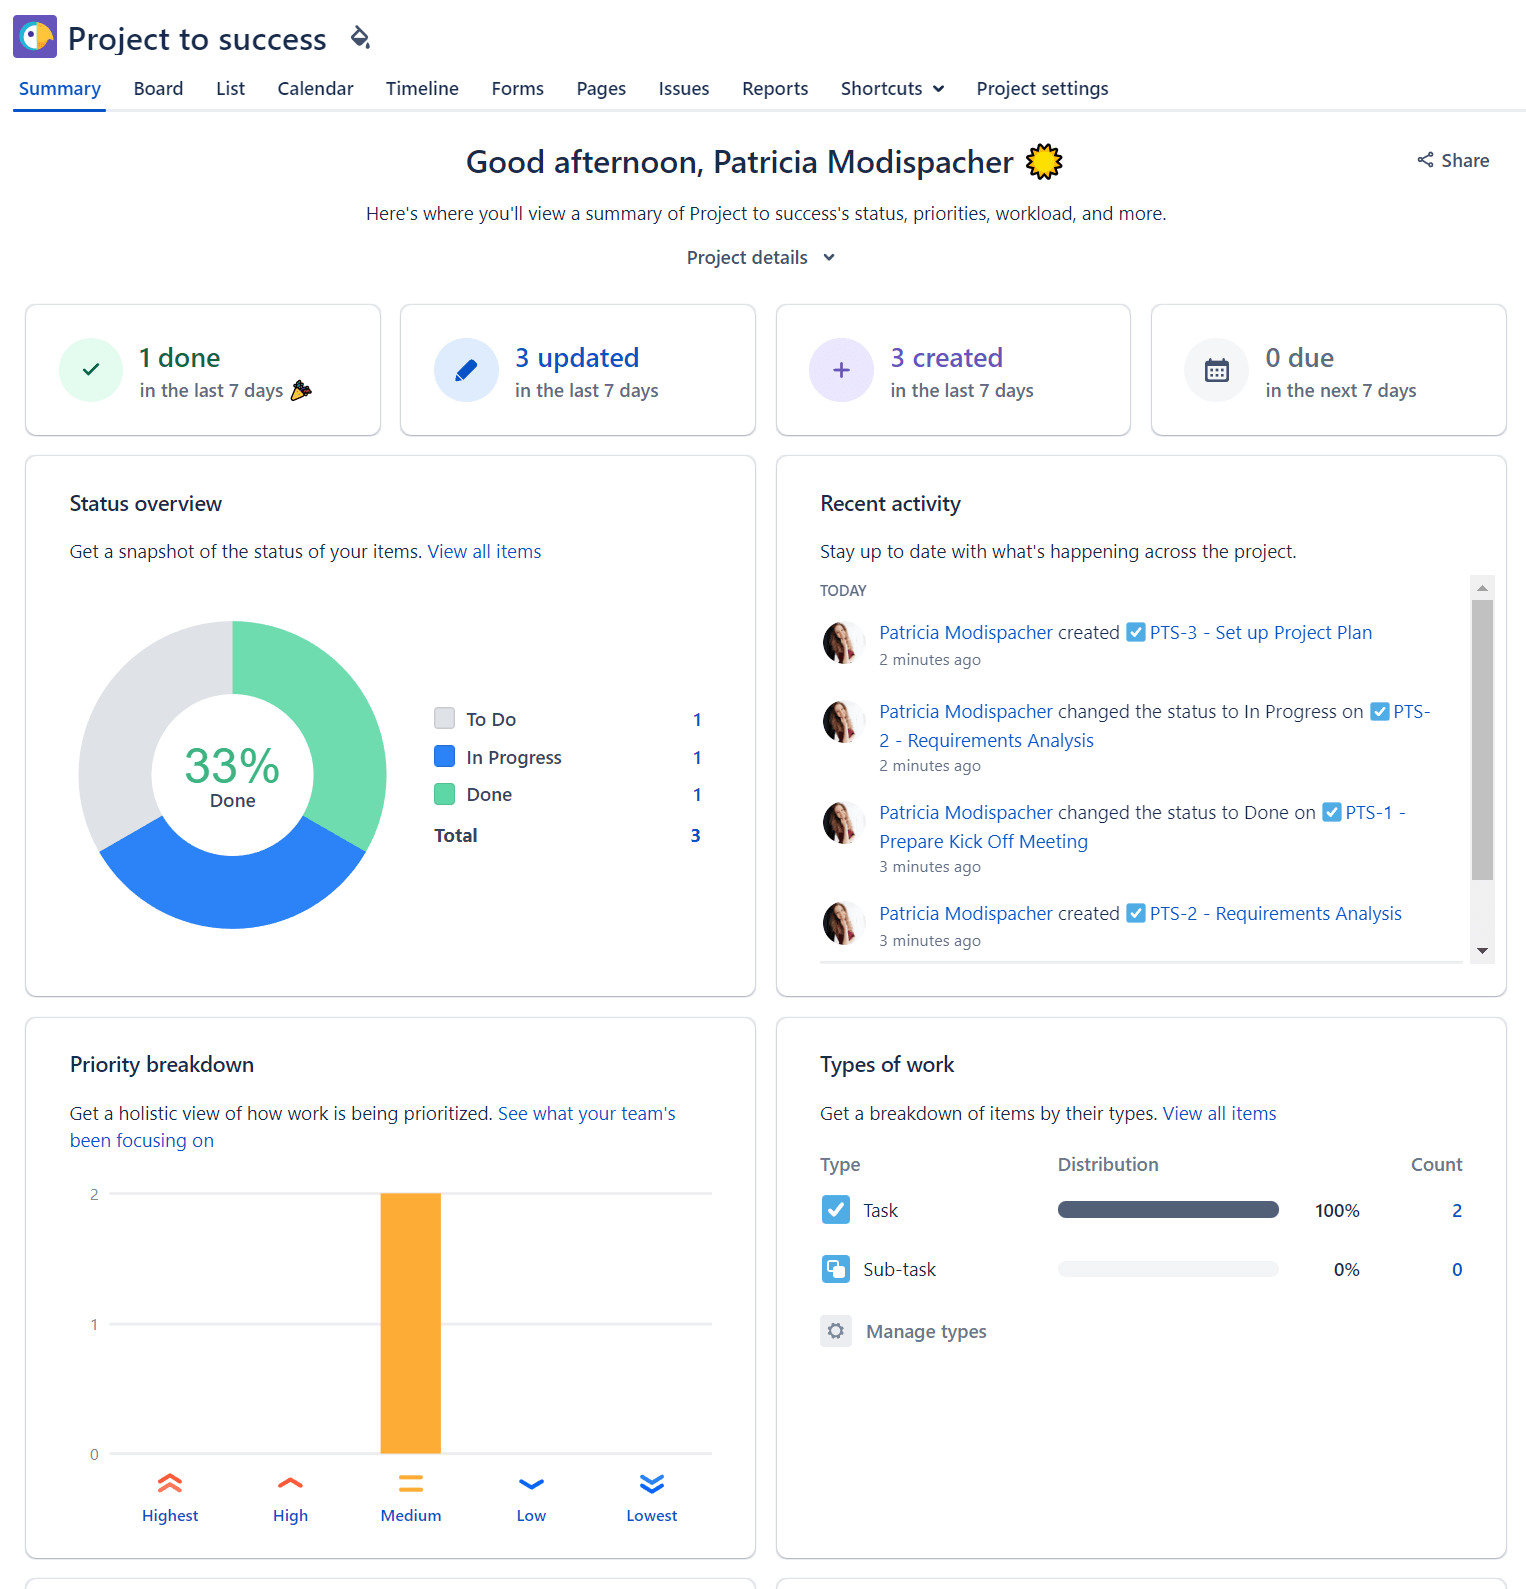
A special highlight of this template is the dashboard, the overview that shows you the current status of your project at a glance.

While the Project Management Template is a Jira Work Management template, it works flawlessly in Jira Software. By using this template, you can save precious time in your project management and ensure that all processes are structured and productive. Of course, you can also perform numerous customizations to meet specific requirements, as with workflows.

Workflows in Jira

Workflows in Jira refer to the path that Jira issues take. They are a sequence of states such as “To Do”, “In Progress”, and “Done”. This same default sequence is already preserved in the project management template. Of course, you can customize your project’s workflow and add statuses like “Rejected” and “Feedback”. In project management, workflows in Jira are ideal to monitor and ensure the progress of tasks and thus your success. In addition, workflows can be used to clearly define responsibilities within a team.

To make workflows more understandable, here is an example workflow for reviewing code changes in Jira. The states of a ticket would be as follows:

  • New code change

  • In review

  • Back to review

  • In testing

  • Review successfully completed

  • Review failed

Additionally, Jira workflows can be linked to automations. Manual errors are thus avoided.

Automations

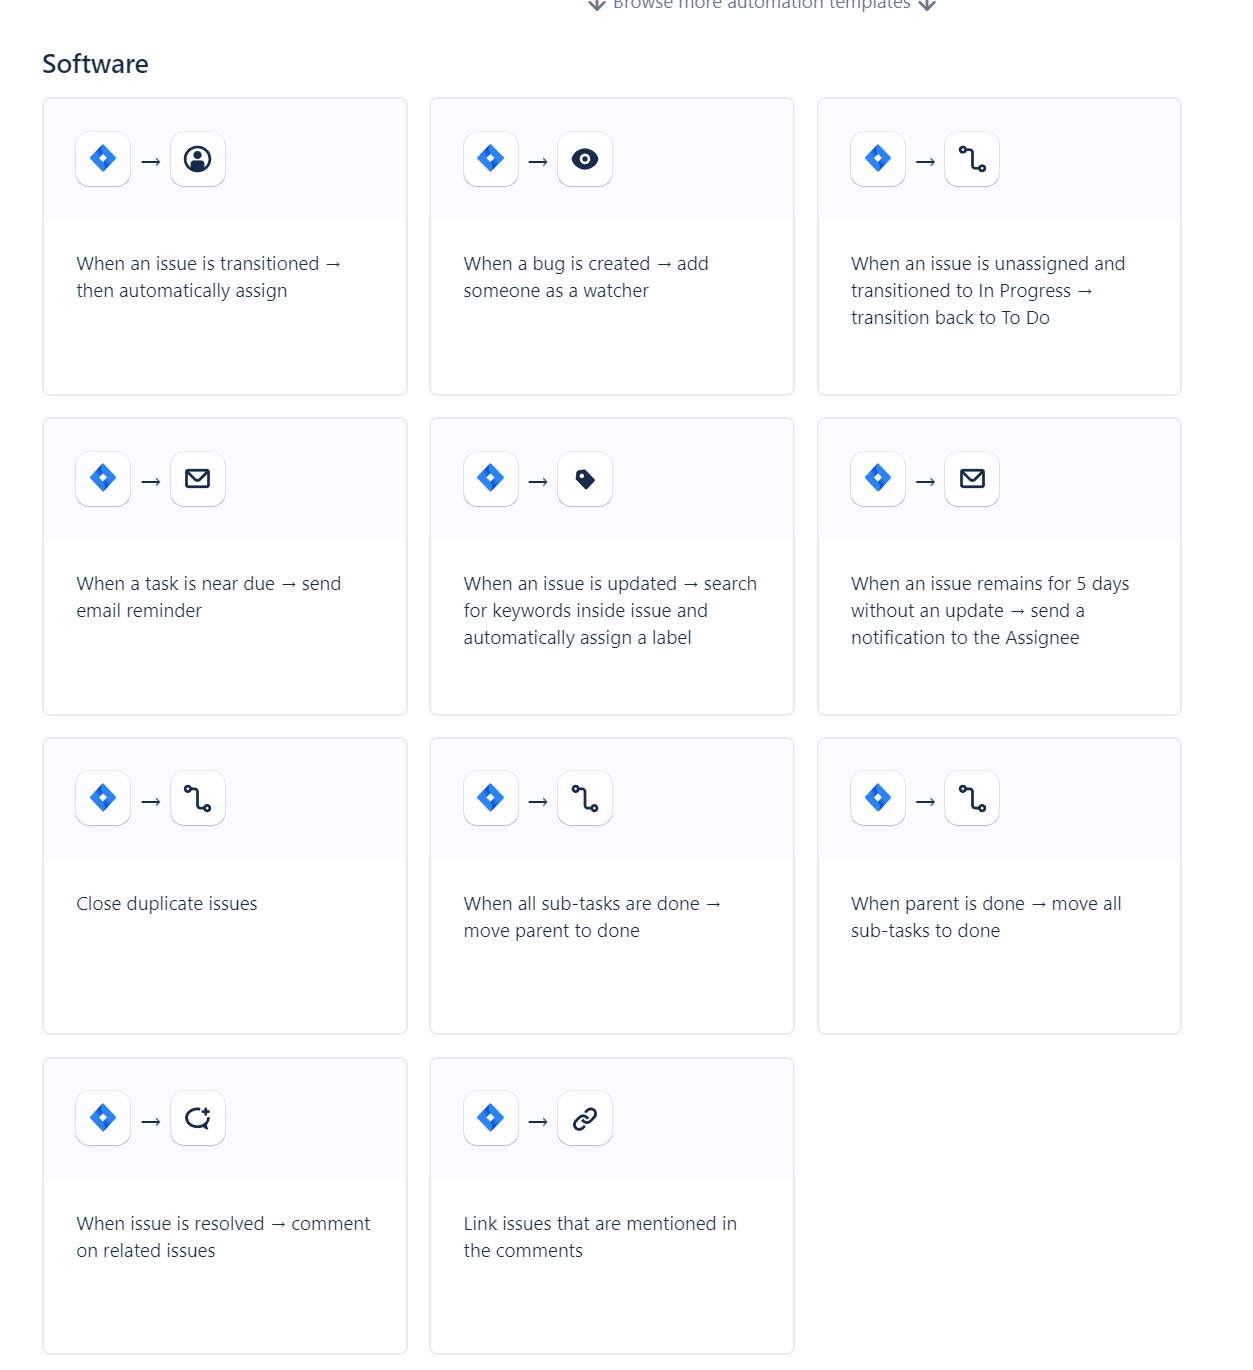
Sounds powerful, and it is. In Jira, an extensive automation feature allows tasks to be performed automatically to optimize your project management productivity.

Examples of Jira automations include:

  • Automatic assignment of tasks based on project scope, priority, or status.

  • Automatic notifications to team members when certain events occur (changes to an issue, completion of an issue)

  • Automatically adding comments to a ticket when the status changes

Again, Jira provides excellent templates that make it easy for you to create an automation:

The mentioned features are only a selection of the many possibilities Jira has to offer. To expand your understanding of Jira’s many features, we encourage you to browse our extensive Jira knowledge base. There you will find information on Jira Epics, Stories, Dashboards and much more.

So much about Jira and its existing features. But how can Jira be used for successful project management?


Phases of project management – and how Jira can be used in each

Typically, project management consists of five phases: project initiation, project planning, execution, monitoring, and project closing.

Below, we’ll dive into understanding each project phase and share Jira project management best practices with you.


Phase 1: Project Initiation

In the first phase of a project, a detailed project plan is created to define all tasks and milestones. Budgeting, risk assessment and definitions of roles and responsibilities should also be clarified in this phase. The well-known W-questions (Who, what, when, in what way, how much and above all WHY in the first place?) are defined here and recorded transparently.

Project Initiation with Jira

With Jira, your project initiation gets a boost from the fact that all project tasks and requirements can be turned into Jira Issues. To do this, you first need to create a project in Jira.

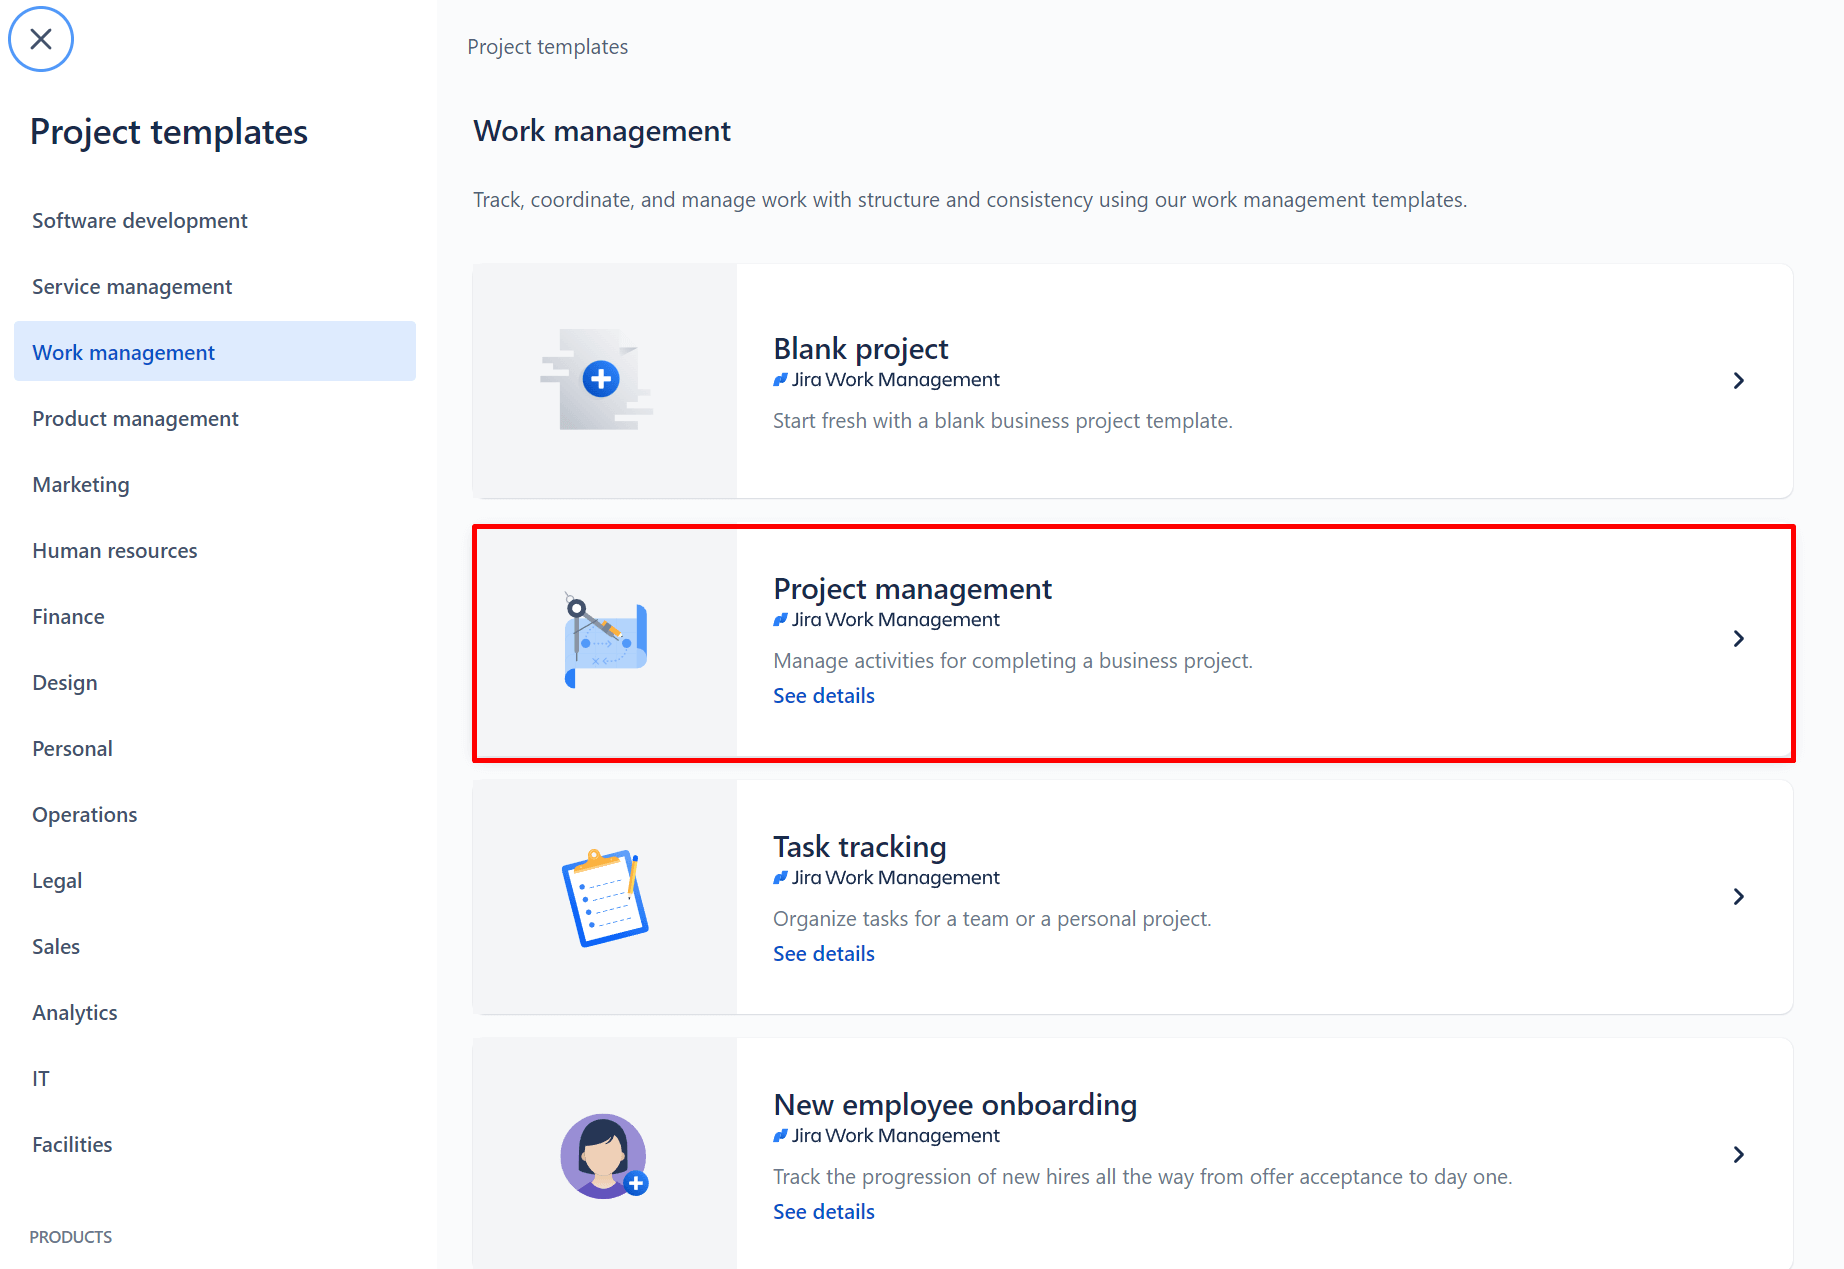
Navigate to Templates > Work management > Project Management in Jira:

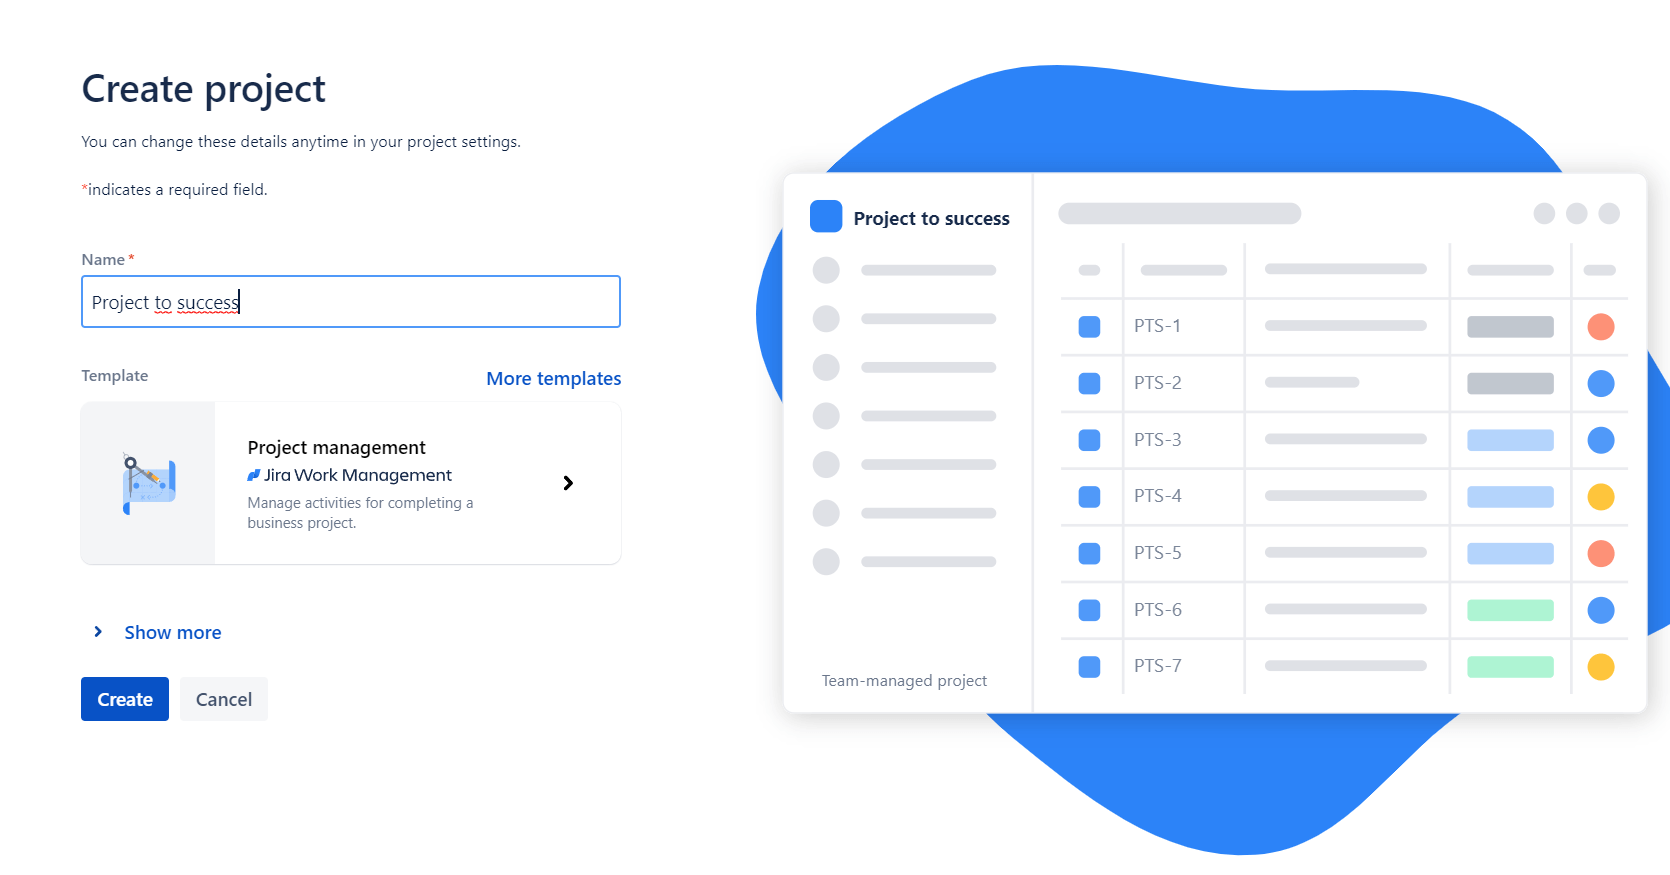
After selecting the template, give the project a unique name so that all stakeholders know what it is about.

Now you can configure your Jira project as you wish. Add all stakeholders as Jira users, so they have full visibility of the project’s progress at all times. And create your individual team to complete your project successfully.

Now you can start generating small tasks and convert them into tickets/issues. For example, you create a ticket: “Plan kick-off meeting”, as explained above. Describe the tasks in detail, add attachments to the tickets, and divide them into smaller subtasks. Assigning tickets to your team members will make it easier to keep track of all future tasks.

During project initiation, Jira supports you as a documentation platform to define, collect, track and prioritize all project requirements. Once your stakeholders are added as Jira users to your Jira project, you can independently create Jira tickets and document your requirements here for the outline data of the project goal.


Phase 2: Project planning

In the second phase, things get concrete. The implementation of the project is now planned and structured. A detailed project plan describes all the necessary steps to achieve the project goal. Resources are determined and deadlines set. Be sure to communicate this to your customers as well, this will help with your project planning. A detailed plan lists and describes all milestones, activities, and tasks. The goal here is to provide all stakeholders with an understanding of the strategy and the end destination.

Project planning with Jira

Once you have created your Jira project, you can now create a board. This is a visual representation of all the tasks in your project. This way, you can organize your project management milestones in a targeted way.

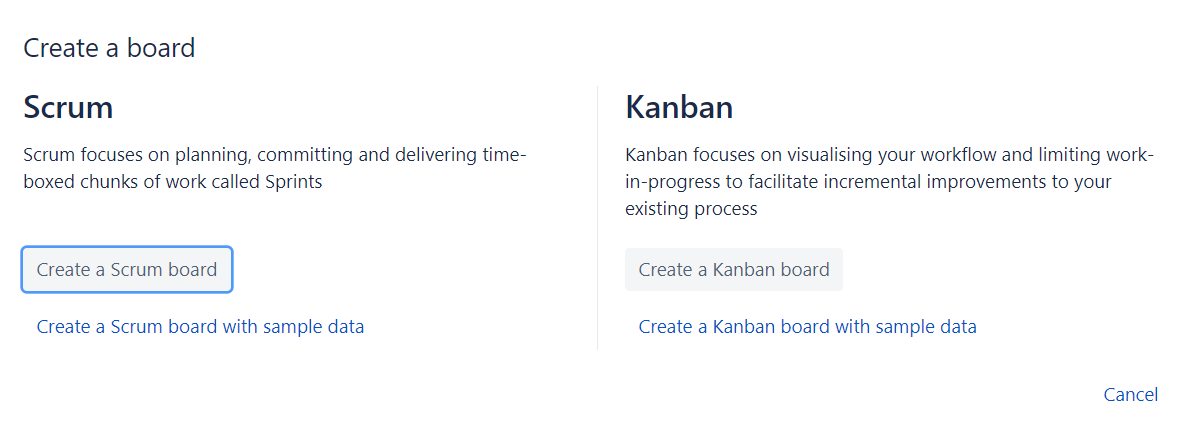
How to create a board in Jira

  • Navigate to Search > Show All Boards

  • Click on Create board

  • In the next step, you can choose whether you want to create a Scrum or Kanban board

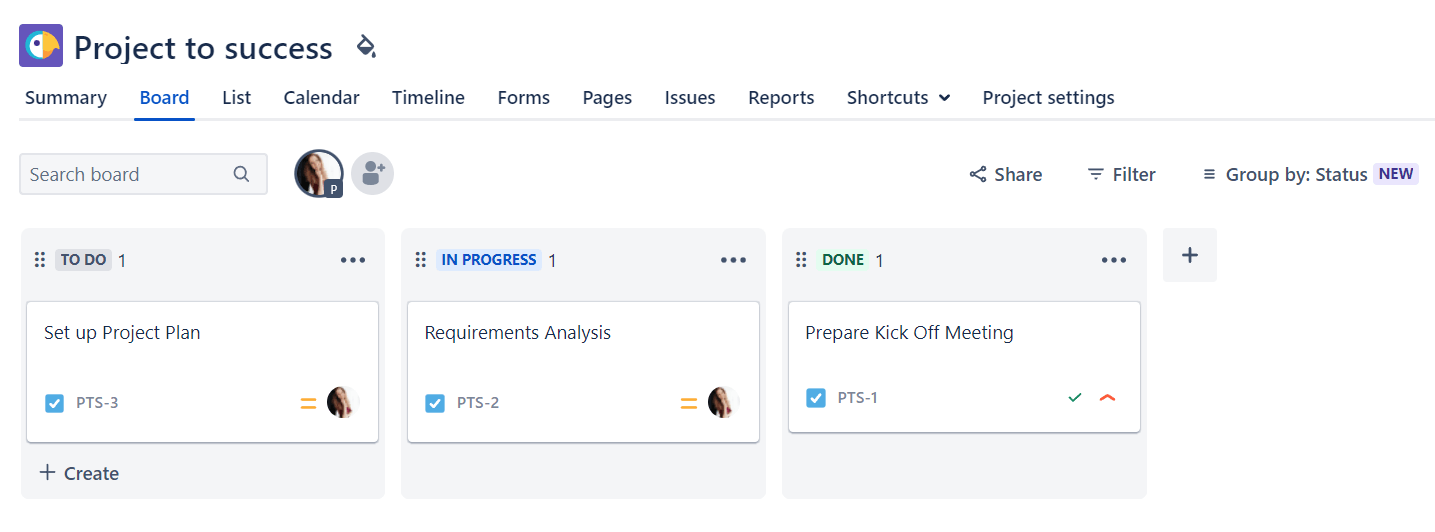
The view of the actual board varies from Scrum to Kanban, as well as the selection of your project template.

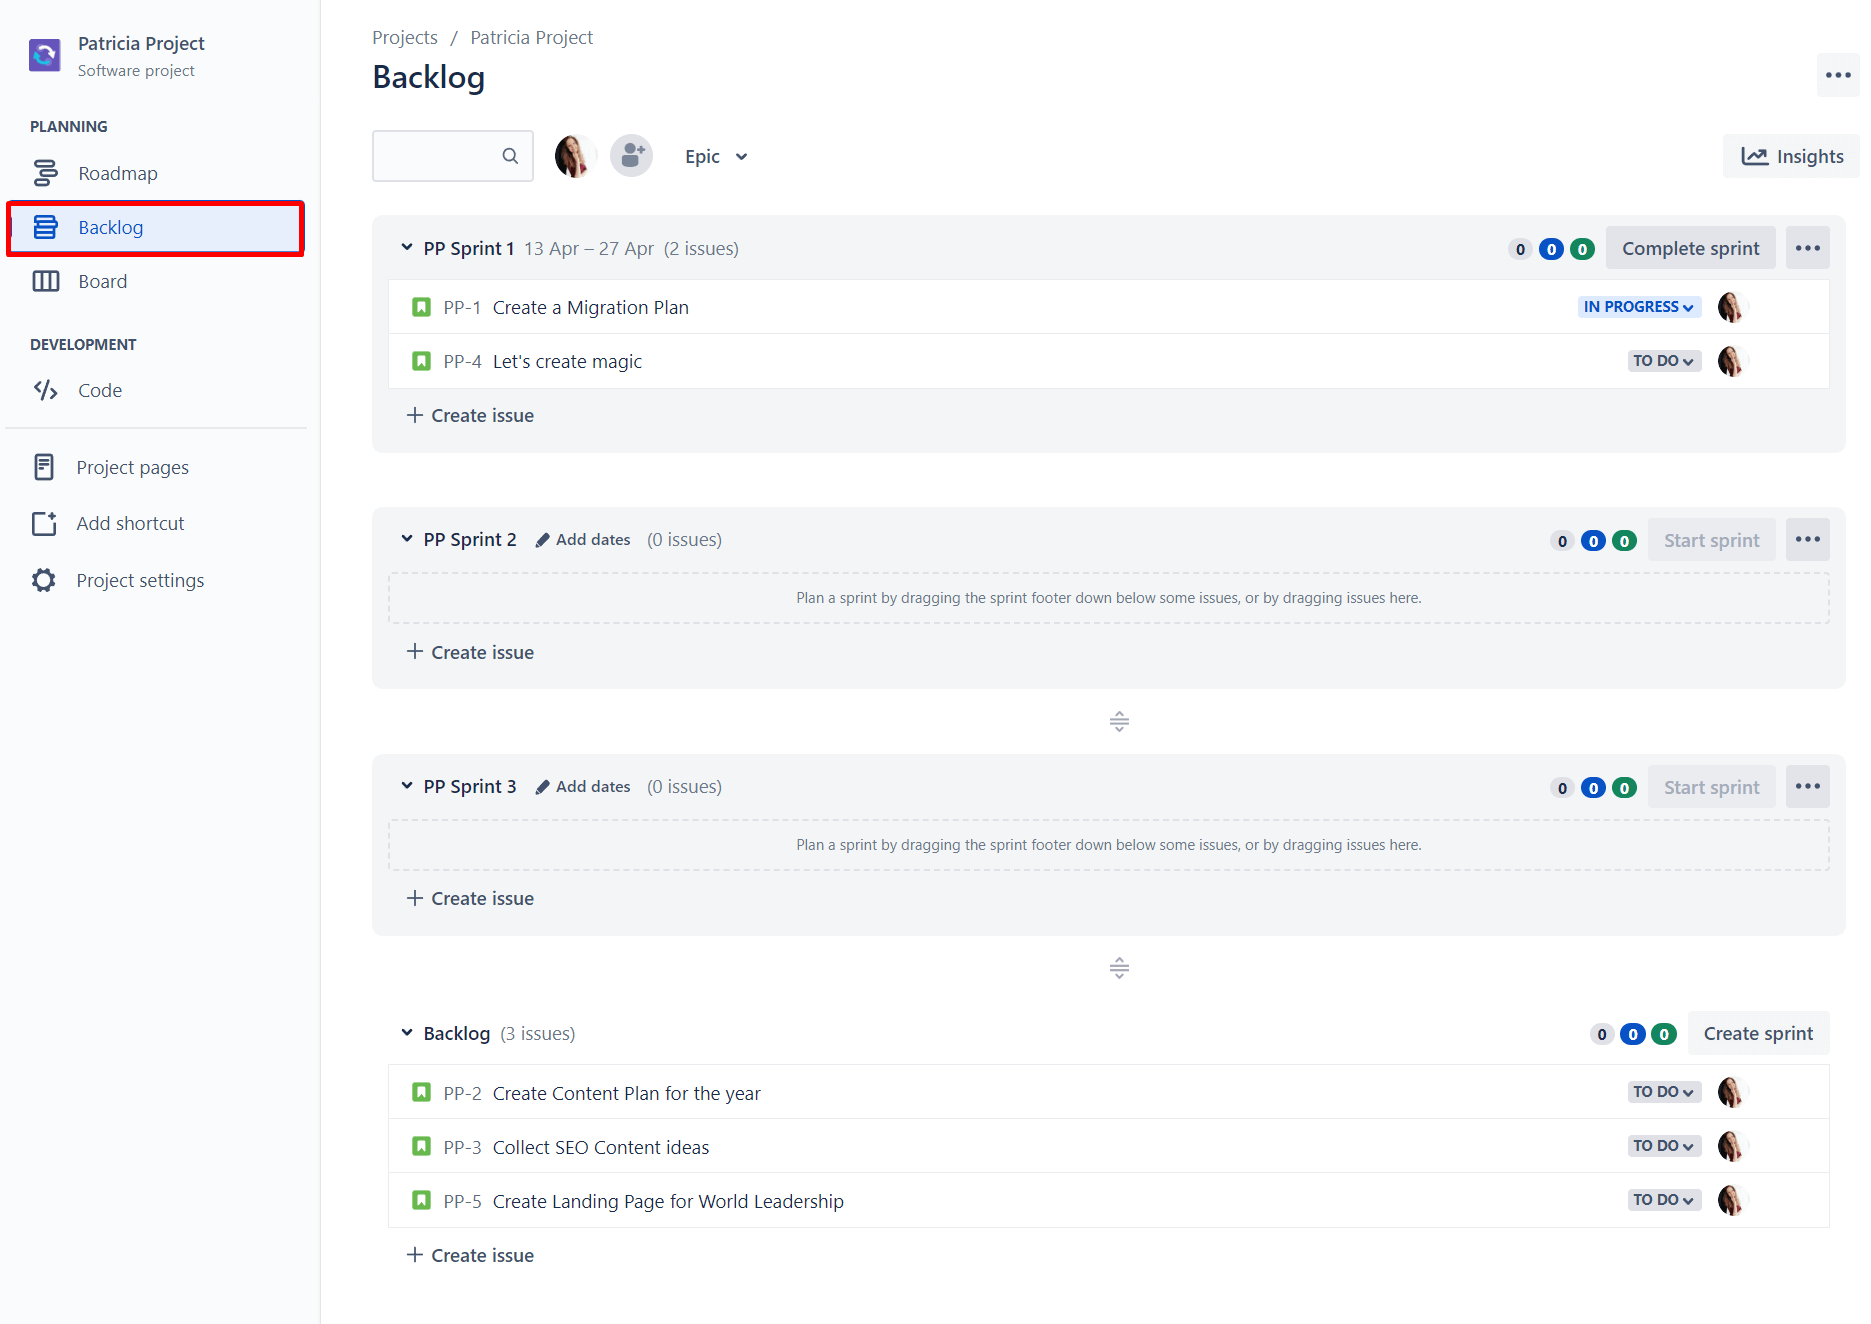
Scrum Board
Board with the project management template

Once you have created your board, you can configure it: Customize columns, filter, and drag tasks onto the board to prioritize and track them.

With agile sprint planning, you can organize tasks into shorter iterations of usually one to two weeks.

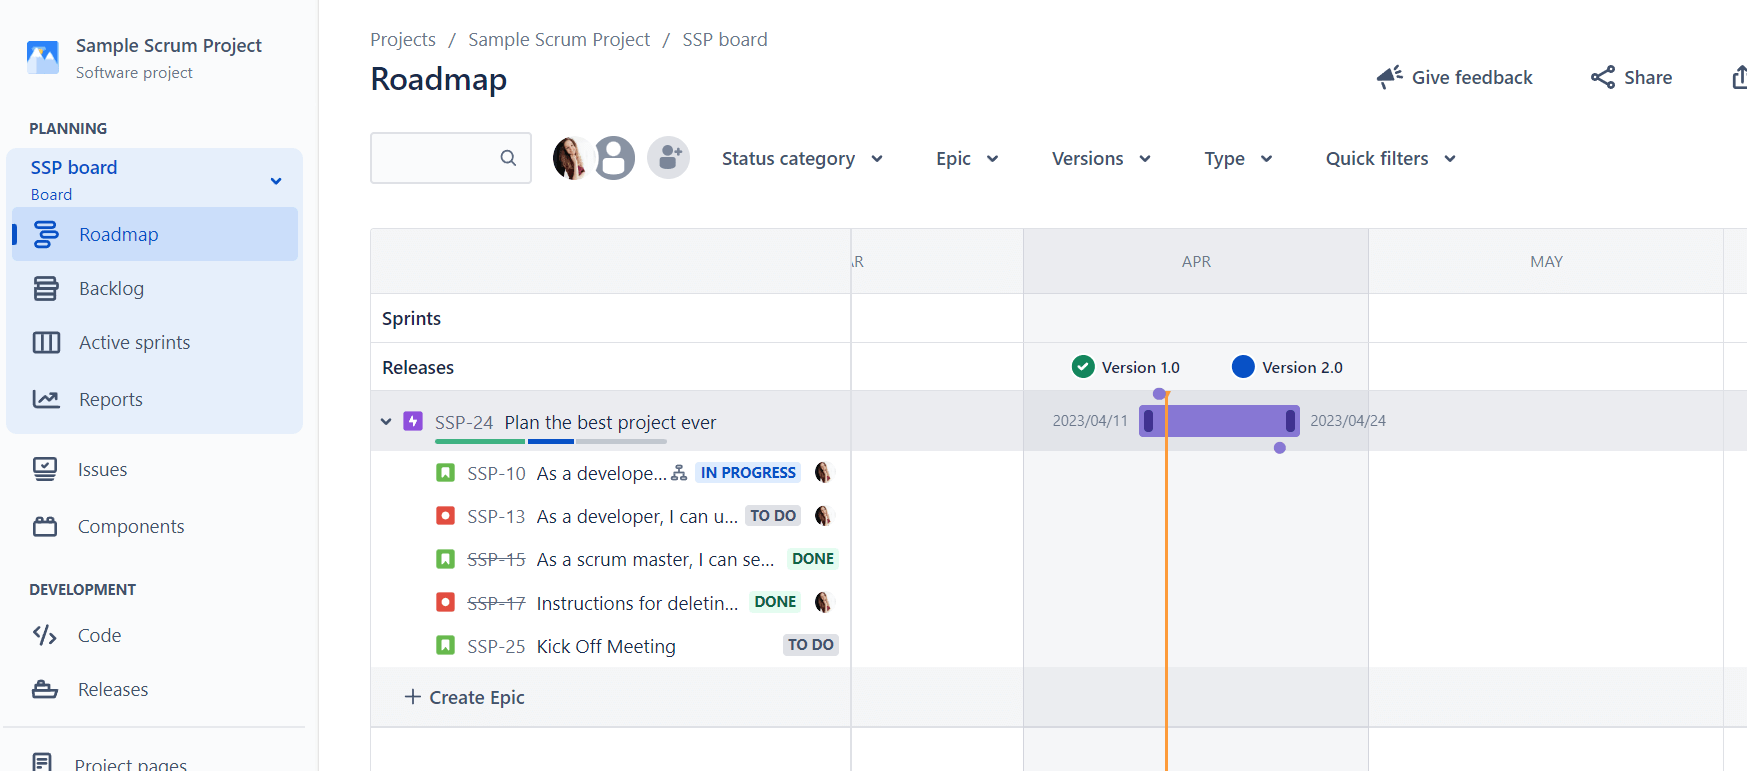
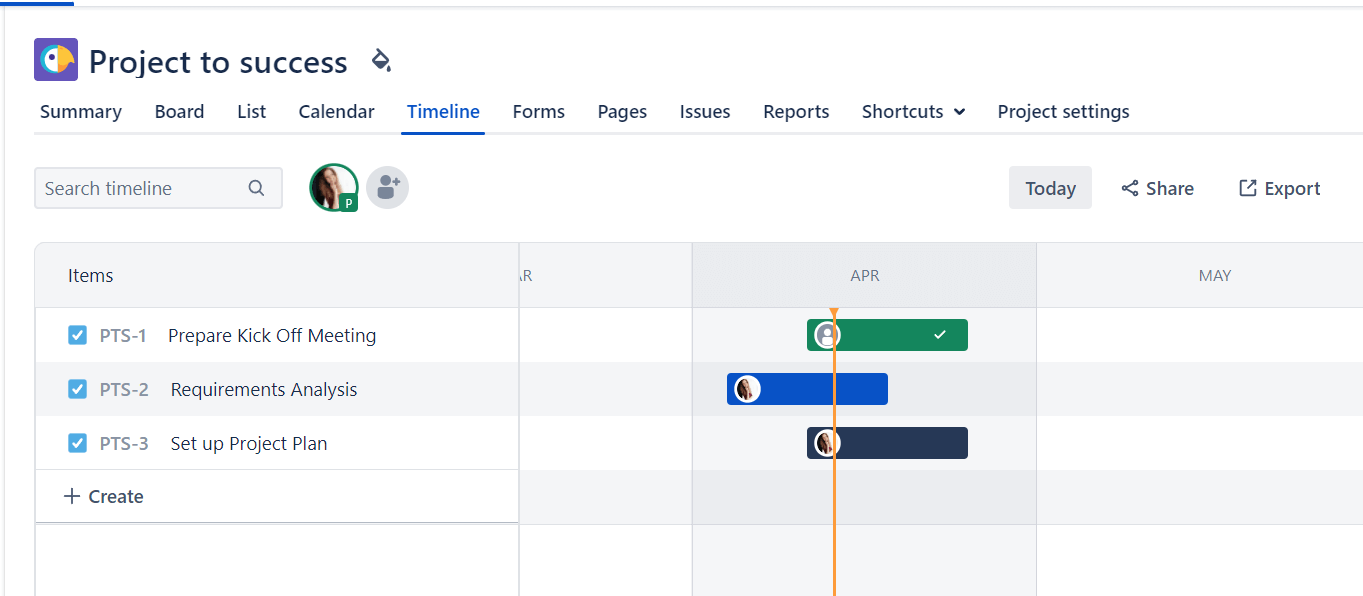
But what would good project planning be without a clear roadmap? You can also easily create one with Jira. All you have to do is add the Epic Link from your roadmap to your existing tickets.

Roadmap in Scrum-Board
Timeline in project management board

The advantage of using Jira for your project plan is that you can track all changes in real time. Lisa is sick and can’t plan the kick-off meeting? Then let’s assign it to Peter. After all, he still has capacity for this sprint.


Phase 3: Project execution

In the third phase of your project, the target-performance comparison takes place. The tasks defined in the project plan are executed. Based on milestones and targets, tasks and requirements can be adjusted using agile methods if necessary. During project execution, it becomes apparent how good your initially created project plan really is. Experience shows that this is where most mistakes and stumbling blocks occur. Communication problems, skyrocketing costs and other risks make it difficult for you during execution.

Project execution with Jira

To help you identify and address risks early on, Jira offers some best practices for project execution.

Keep an overview

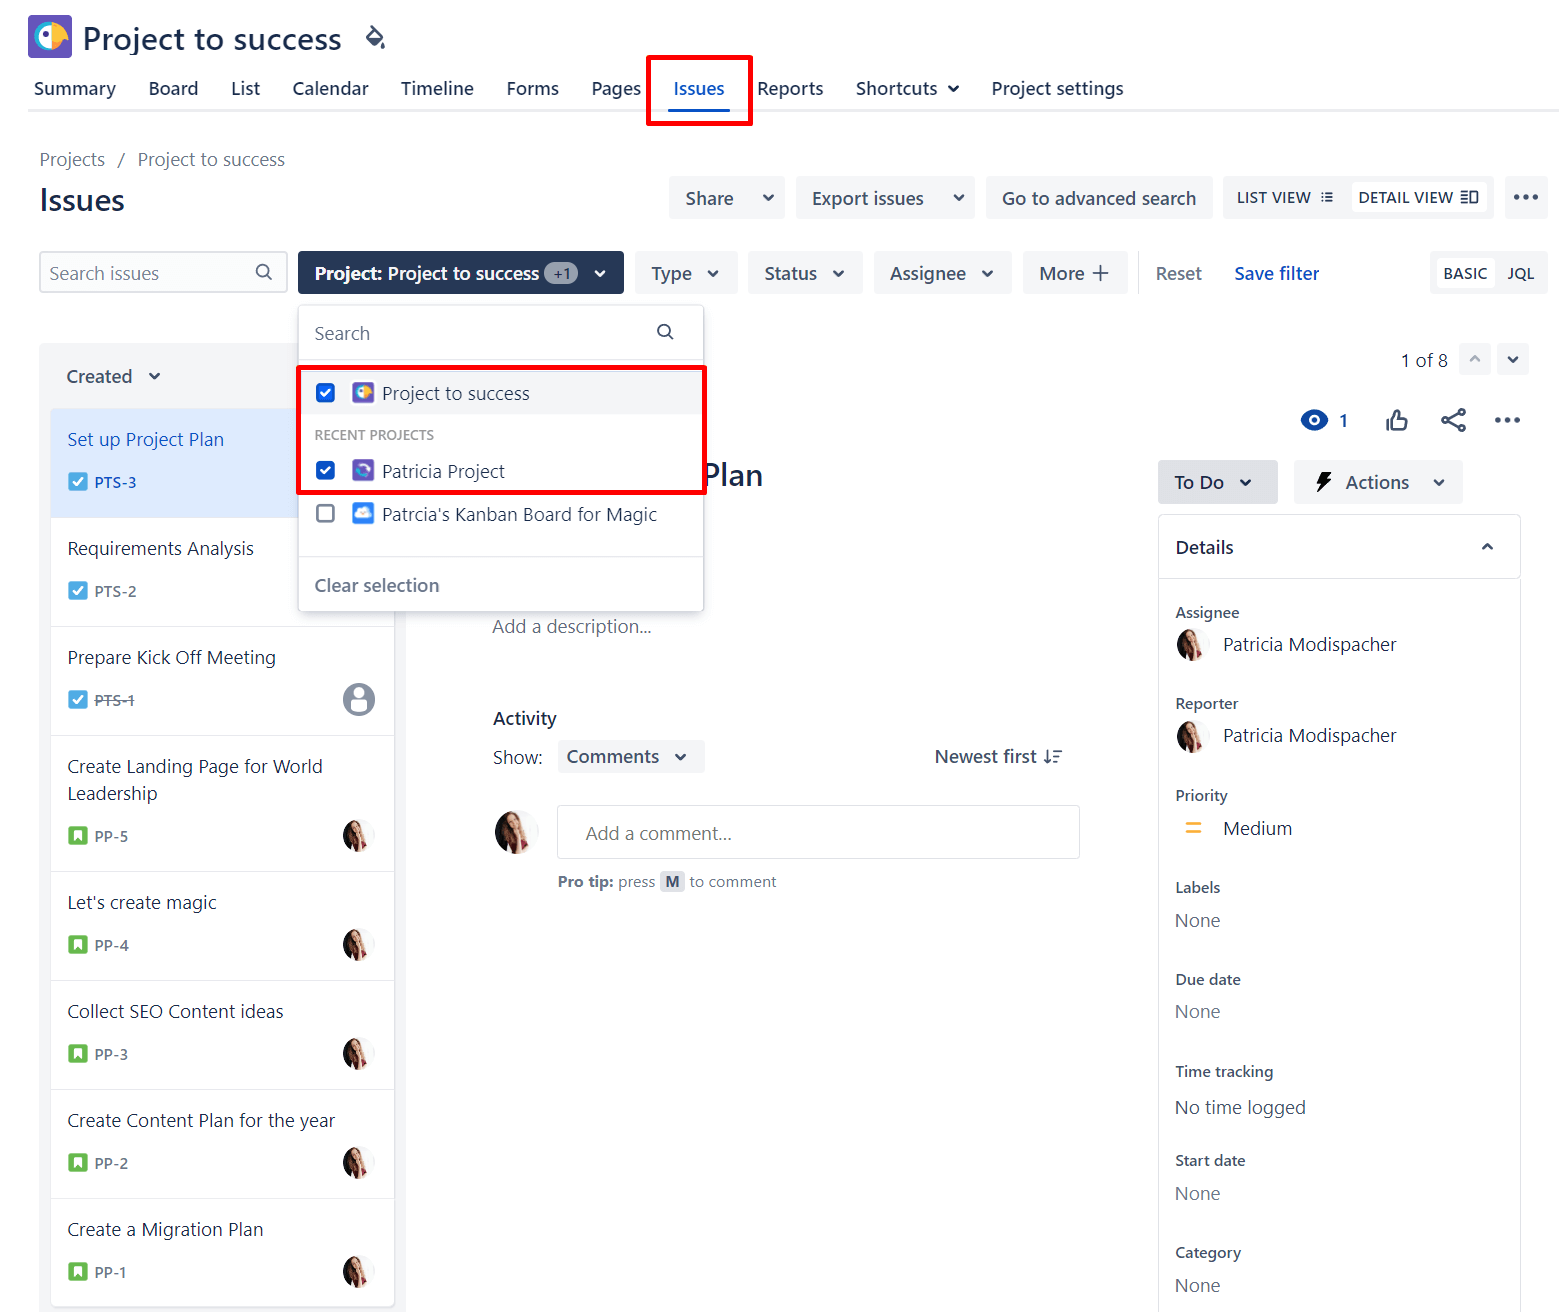
Wouldn’t it be nice if you were only responsible for one project? However, usually, you are responsible for multiple teams and goals at the same time. Another advantage of the Jira project management template is that you can select the individual tasks of different (or all) projects for consideration in the issue view.

Working with components

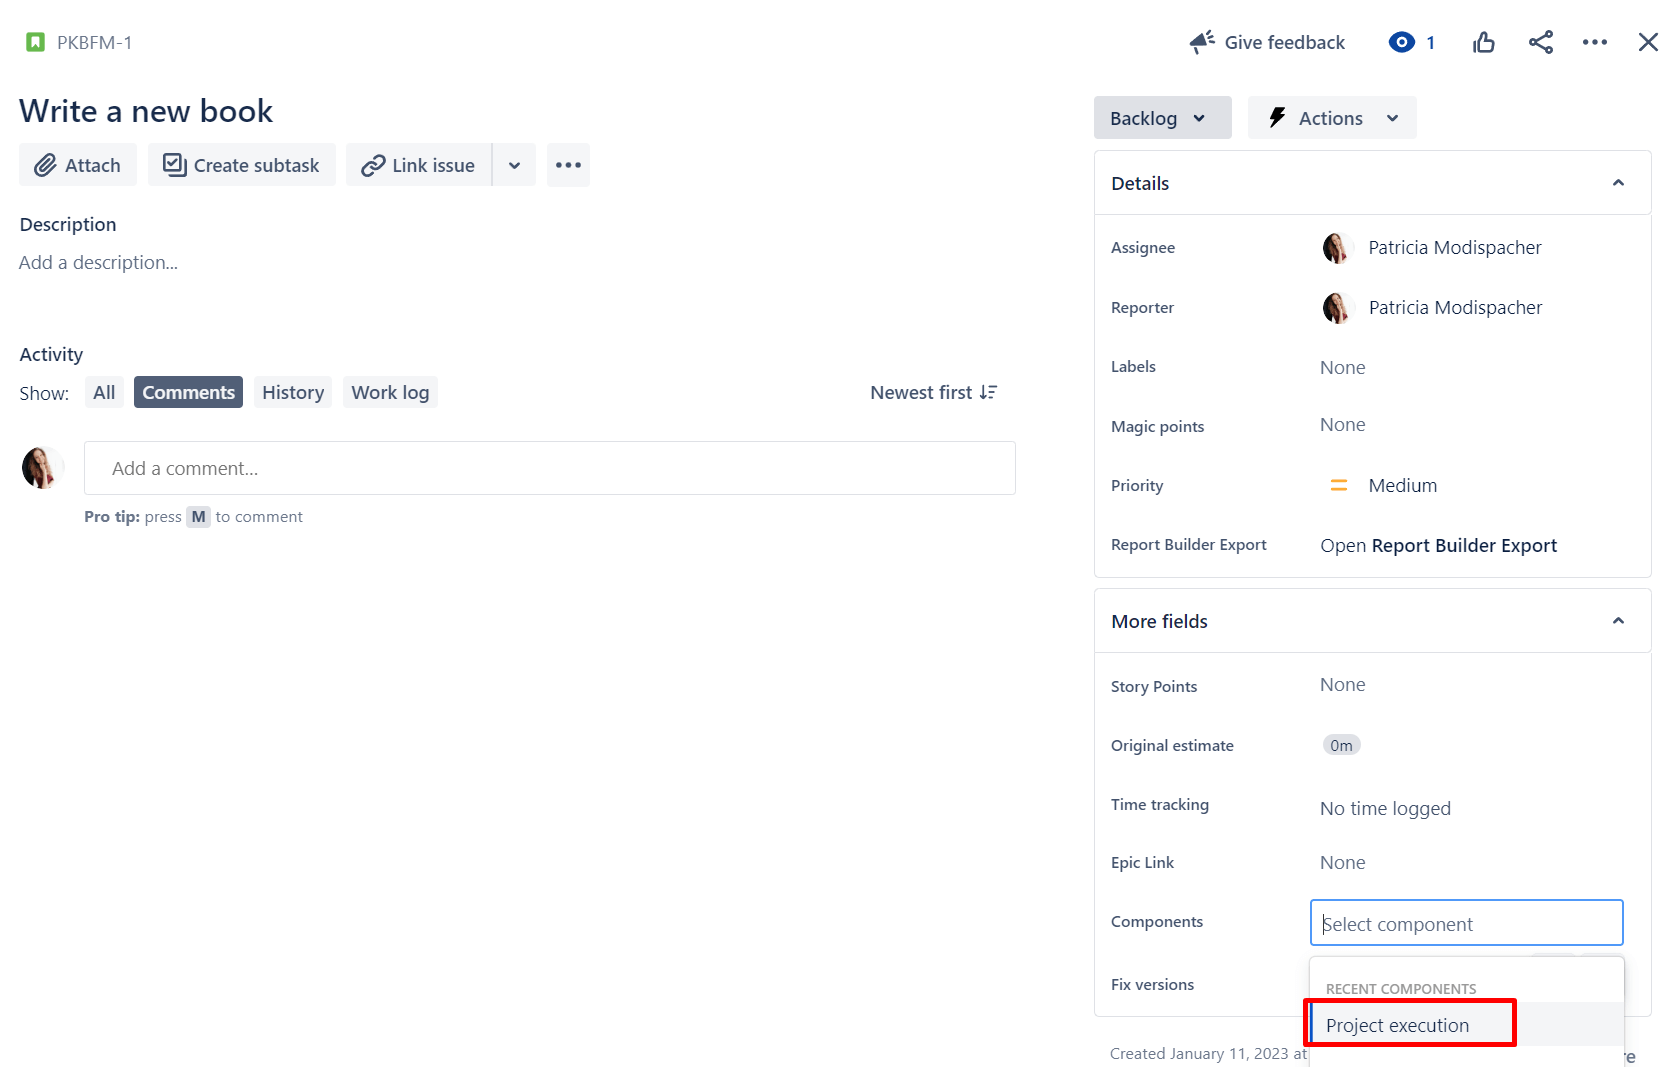
Jira components are parts of a project. Thanks to components, Jira gets more structure because the division into teams, modules, functions, as well as subprojects, can be done easily this way. Components are also a helpful tool for reporting. As a Jira admin, you can create components at the project level. Then, each team member can assign the component to different tickets.

This allows you to ideally filter according to your individual requirements. Here, for example, which tasks need to be completed in the project execution.

Time tracking

Without accurate time tracking, the project cannot be successfully executed. How are you supposed to know which of your team members is currently immersed in work and behind schedule if the working time is not tracked?

For this, Jira offers some implemented approaches, but this time tracking method quickly reaches its limits. Working time has to be calculated by yourself, a calendar overview is missing, and data protection is a completely different matter.

Since Jira can be customized to any requirement, you can simply download the Timesheet Builder application from Atlassian Marketplace. An integrated timer will change your world and make time tracking per ticket a breeze!

By the way, the app is also suitable for creating Jira teams and roles and permissions management. Learn more here: Jira time tracking best practices.

Automations in Jira

As a final recommended approach to project execution with Jira, let’s take another look at Jira Automations. An example related to code editing might look like this: Let’s say a developer edits some code and sets the corresponding Jira ticket to “In Progress”. You, as the project manager, would like to be automatically notified when this edit takes longer than a day so that your schedule can be met.

In Jira, you can create an automation that does the following:

  1. When a ticket gets the status “In Progress”, a timer is started.

  2. When the timer reaches one day, an email is automatically sent to you informing you of the unscheduled processing time.

  3. Once the ticket is processed and the status is set to “Done”, the timer stops and automation ends.

This is just one of the many ways Jira automations can facilitate your project planning.


Phase 4: Monitoring

The fourth phase of project management is project control and monitoring. Now, it is important to ensure that the project stays on track. Time tracking also plays a role, as it did in the previous phase – often mixing phase three and four, or more precisely the tools to master them. With reporting of KPIs, budget, resources as well as deadlines, you will succeed in monitoring your project and communicating satisfactorily to stakeholders.

Monitoring with Jira

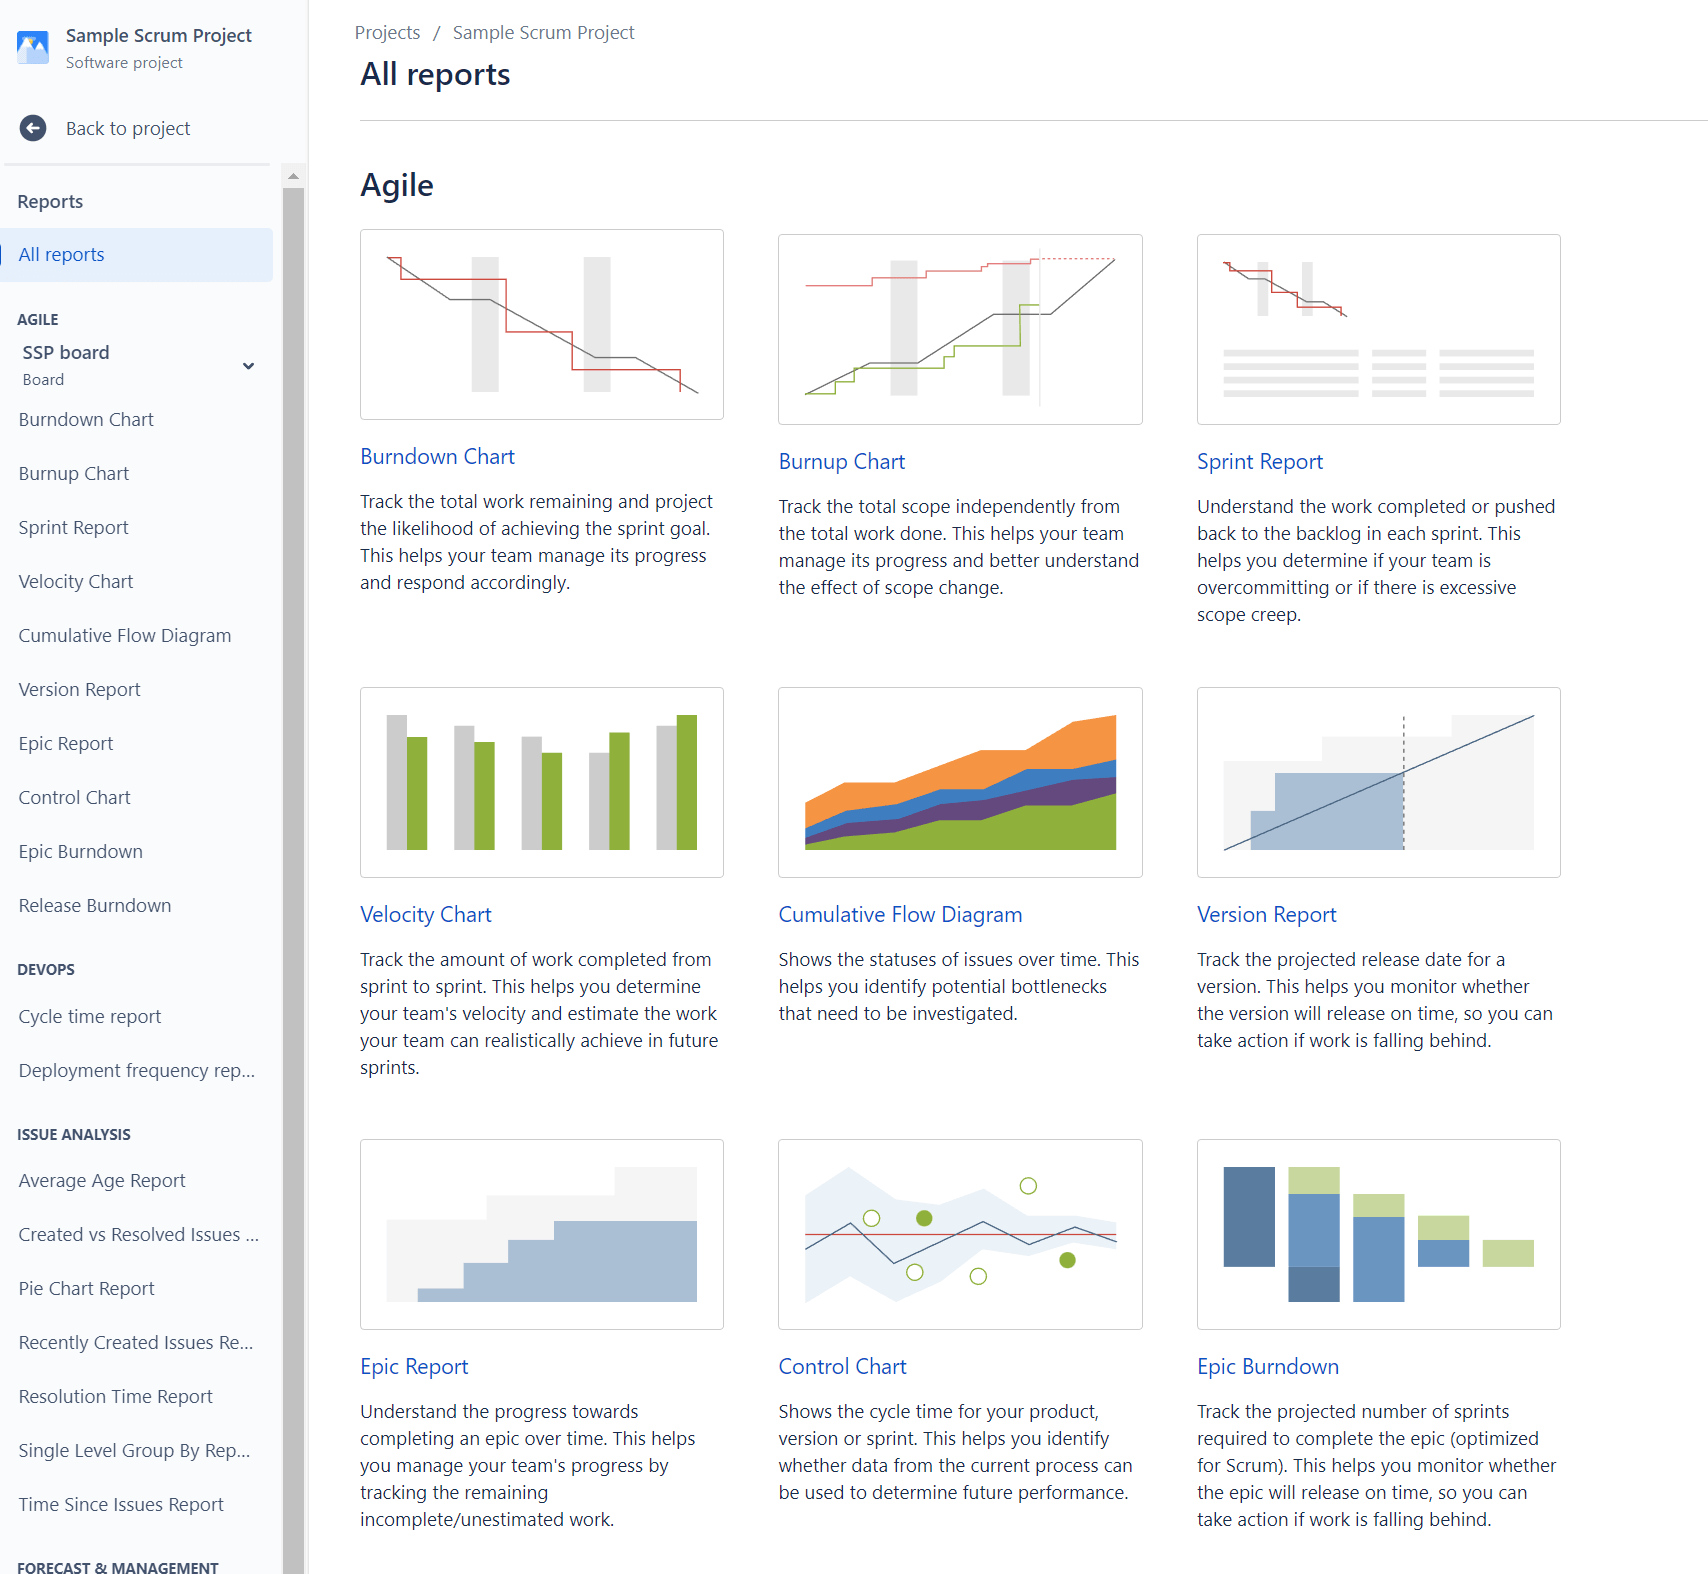
Jira already offers a variety of built-in reports that provide you with detailed information about the status of your project. Some reports are:

  • Sprint Report: the Sprint Report provides an overview of the progress of the current sprint and helps the team track commitments and plan next steps.

  • Burndown Chart: The Burndown Chart visualizes the progress of the sprint and gives an idea of how much work still needs to be done.

  • Velocity Chart: The Velocity Chart shows the velocity of the team.

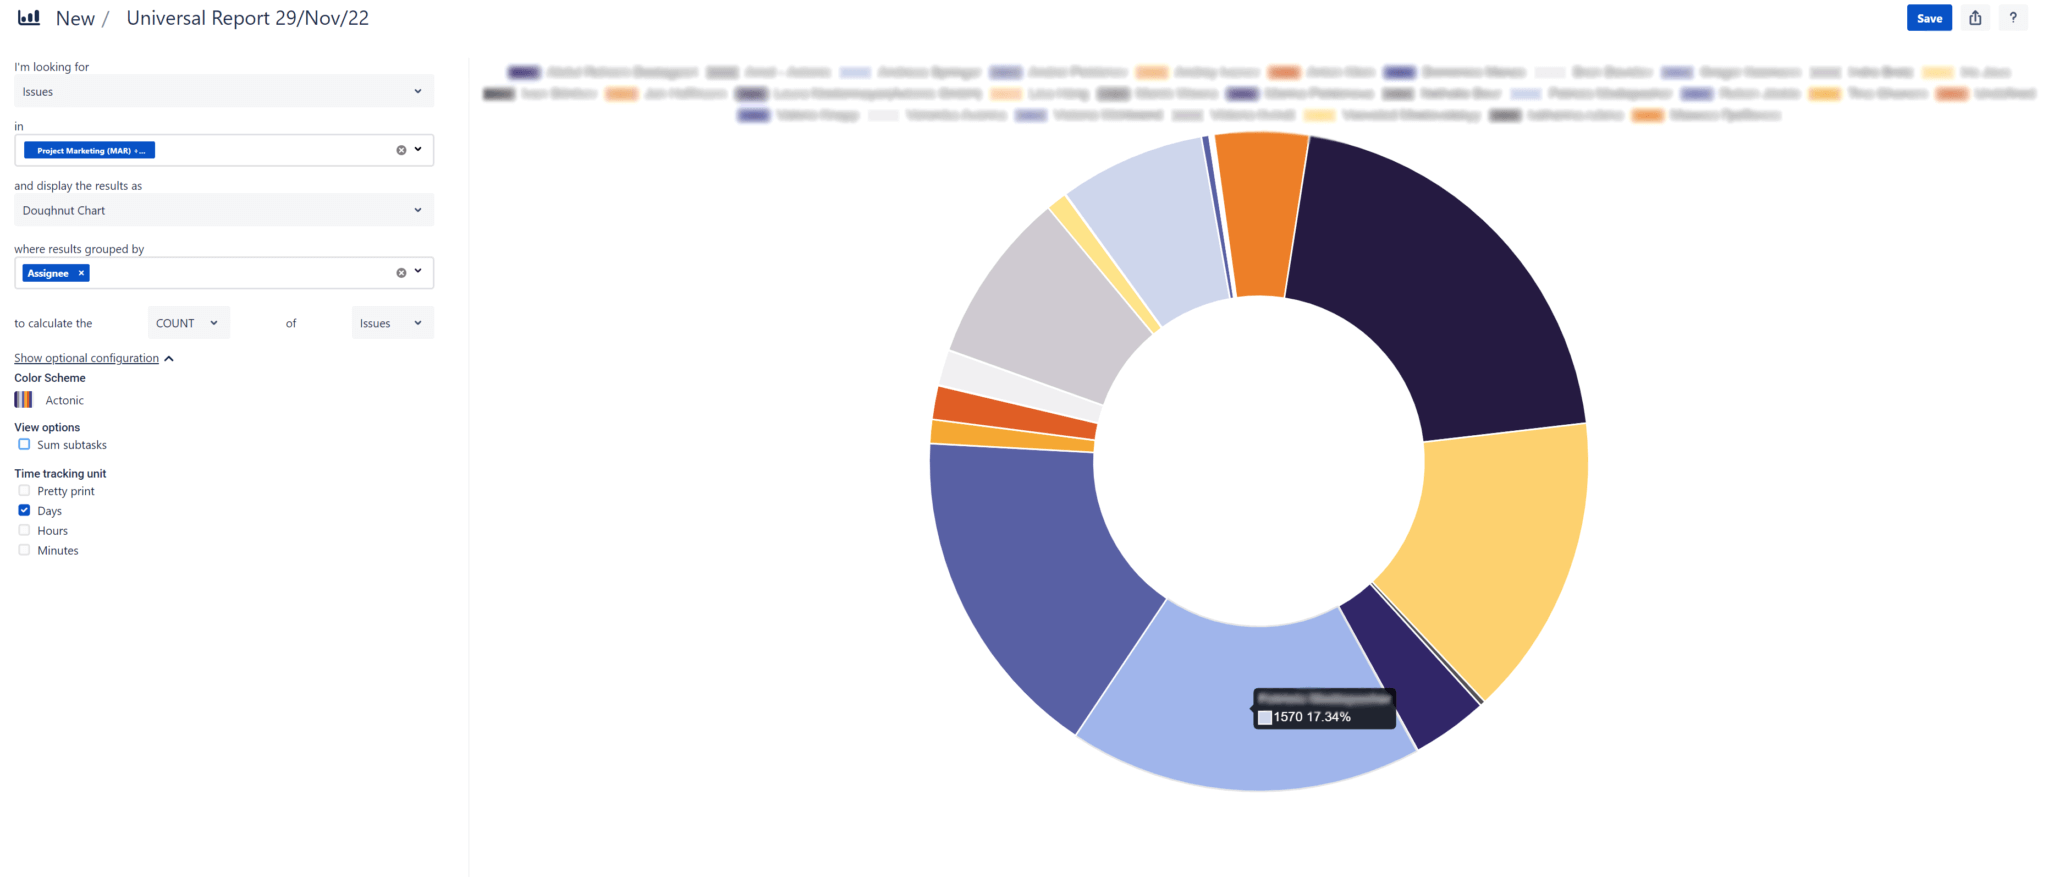
Custom Jira Reports

As with “out of the box” time tracking in Jira, Jira’s built-in reporting is not sufficient for all needs. Just the desire to view reports with real-time data is not possible in Jira without a plug-in. The ultimate comparison of Jira reporting plug-ins highlights Report Builder. This tool includes easy-to-use no-code report templates:

But also the ability to write your own report from scratch!

If you have specific requirements but not the sufficient resources, our Report Building Service will be happy to create any Jira report you can imagine and help you visualize your success.

With an appropriate reporting tool, you can ensure that all deadlines are met and that your stakeholders can easily see the status of the project at any time.


Phase 5: Project closure

Congratulations! You and your team only argued five times, aged several years, and eliminated numerous pounds of coffee.

Hopefully, it wasn’t that bad.

Or was it?

In the final phase of project management, you complete all tasks and deliver the results to your stakeholders. In the project closeout report and final meetings, you evaluate the success of your project. Your team creates a final documentation and conducts a post-implementation analysis. In this way, you find out what worked smoothly and what needs to be improved in the next project.

Project closure with Jira

  • In Jira, you can close a project by using the archive function. However, keep in mind that it can then no longer be edited or viewed – only in the archive space. Another way to close a project in Jira is to disable the permissions for the project. Then it is read-only and can still be viewed.

  • The use of a Jira board is recommended for creating the closing documentation.

  • Retrospective is also an easy task through reports and dashboards in Jira, which is the crowning glory of your fruitful project management.

  • Survey data can also be collected flawlessly in Jira, allowing you to address questions about functionality, usability, and project processes.


Why use Jira for project management?

After seeing how much Jira can support you throughout the project lifecycle, it’s no surprise that Jira is the number one project management tool. Compared to other tools like Excel, Trello, and the like, Jira dynamically adapts to your agile method of choice. Scrum, Kanban, Scrumban, whatever you prefer: with Jira everything is possible. If you have special requirements such as privacy-compliant time tracking or customizable Jira reports, there are numerous apps in the Atlassian Marketplace to extend Jira’s features.

Advantages of Jira for project management at a glance

  • Anywhere, anytime access to project status in real time

  • Asynchronous communication can be revolutionized by comment functions

  • Single source of truth: All information for all stakeholders united in one place

  • Easy expansion of functions through marketplace apps

  • Optimal risk management through real-time tracking

  • Quick creation of projects thanks to ready-made project management templates

  • Comprehensive reporting and analysis

  • Manage resources perfectly thanks to tickets, components and more

  • Promotes transparency and collaboration within the team

  • Scalable for projects of any size and complexity


Conclusion: Jira for project management is an advantage in every phase

Our detailed illustration has shown that Jira is an asset for every phase of project management. All challenges such as resource management, communication, and risk management are mastered easily with Jira. The numerous features like templates, boards, workflows, or reports make it the ultimate project management tool for every agile team. Save yourself the time of entering your detailed plan into Excel or manually creating reports: Thanks to Jira, many project management methods can be automated. Especially, the systematic monitoring of one or even several projects in real time offers an added value for your planning that should not be underestimated.

We have illustrated how exactly you can use Jira for project management with some examples. However, you should keep in mind that from company to company and from project to project, the management requirements can vary greatly. To make sure you get the most out of your Jira project management, it’s best to seek advice from skilled experts. Our Jira Consulting Service consists of multi-certified Atlassian Consultants who will be happy to support you in successfully implementing your projects in Jira. The initial consultation with us is completely free of charge and without obligation. Contact us and revolutionize your project management!

Claim your free consulting session

  • Tailored consulting for your goals
  • Professional software development and implementation
  • Custom training and onboarding plans
Request consultation

How useful was this post?

Click on a star to rate it!

Average rating 5 / 5. Vote count: 4

No votes so far! Be the first to rate this post.