Therefore, it is of course also highly recommended to create regular backups in Jira, as vast quantities of data are processed and stored here. In the following article, we want to show you how you can create manual backups of your Jira instance using a Jira add-on.
How to create a manual backup in server and data center?
Ideally you have automatic mechanisms in place to create a backup, but here you would have an additional option that you can use before you do something risky and lose data in the process.
Please note that the following instructions for creating a backup can only be used for the server and data center versions of Jira, and that you must use the Jira add-on “Configuration Manager for Jira“ for this. The Configuration Manager is a paid solution for managing Jira configurations that automates the transfer of configurations and data in Jira.
1. Open the Configuration Manager in your active Jira instance. In order to create a backup, go to “Snapshots” and then to “Create Snapshot”.
2. The assistant for creating the backup opens. Here you have to take the following steps:
-
Select “Project with Issues” if you want to save all project settings including processes.
-
Choose a name for your backup.
-
Add the projects that you want to back up.
-
If all attachments, issues and types such as sub-tasks should be included in the backup, check the relevant box.
-
In order to include all filters and boards in the backup, these boxes should also be checked.
-
Use the “Next” button to continue.
3. Further, other masks open in which you can select which filters, boards, dashboards and apps should be saved in your backup.
4. Afterwards, you can check all settings again in the preview:
-
Your chosen name will be listed.
-
Selected projects of the instance are displayed.
-
Your previously selected filters of the instance are listed and can be adjusted with “Exclude”, should you want to remove a filter again.
-
Selected dashboards of the instance are listed and can be cleaned up on the far right with “Exclude” if a dashboard has been accidentally added beforehand.
-
You can start your backup with “Create”. If major adjustments are necessary, you can return to the default masks using the “Back” button.
5. Your backup has now been created. The Configuration Manager then shows you how many elements were backed up. With “Done” you end the assistant, and you now have access to your backup. You can find this under Snapshots, where all available backups are listed. In order to be able to use the backup, the gearwheel (2) must be selected in the respective line and the snapshot downloaded under “Download” (3). The backup is available as a ZIP file.
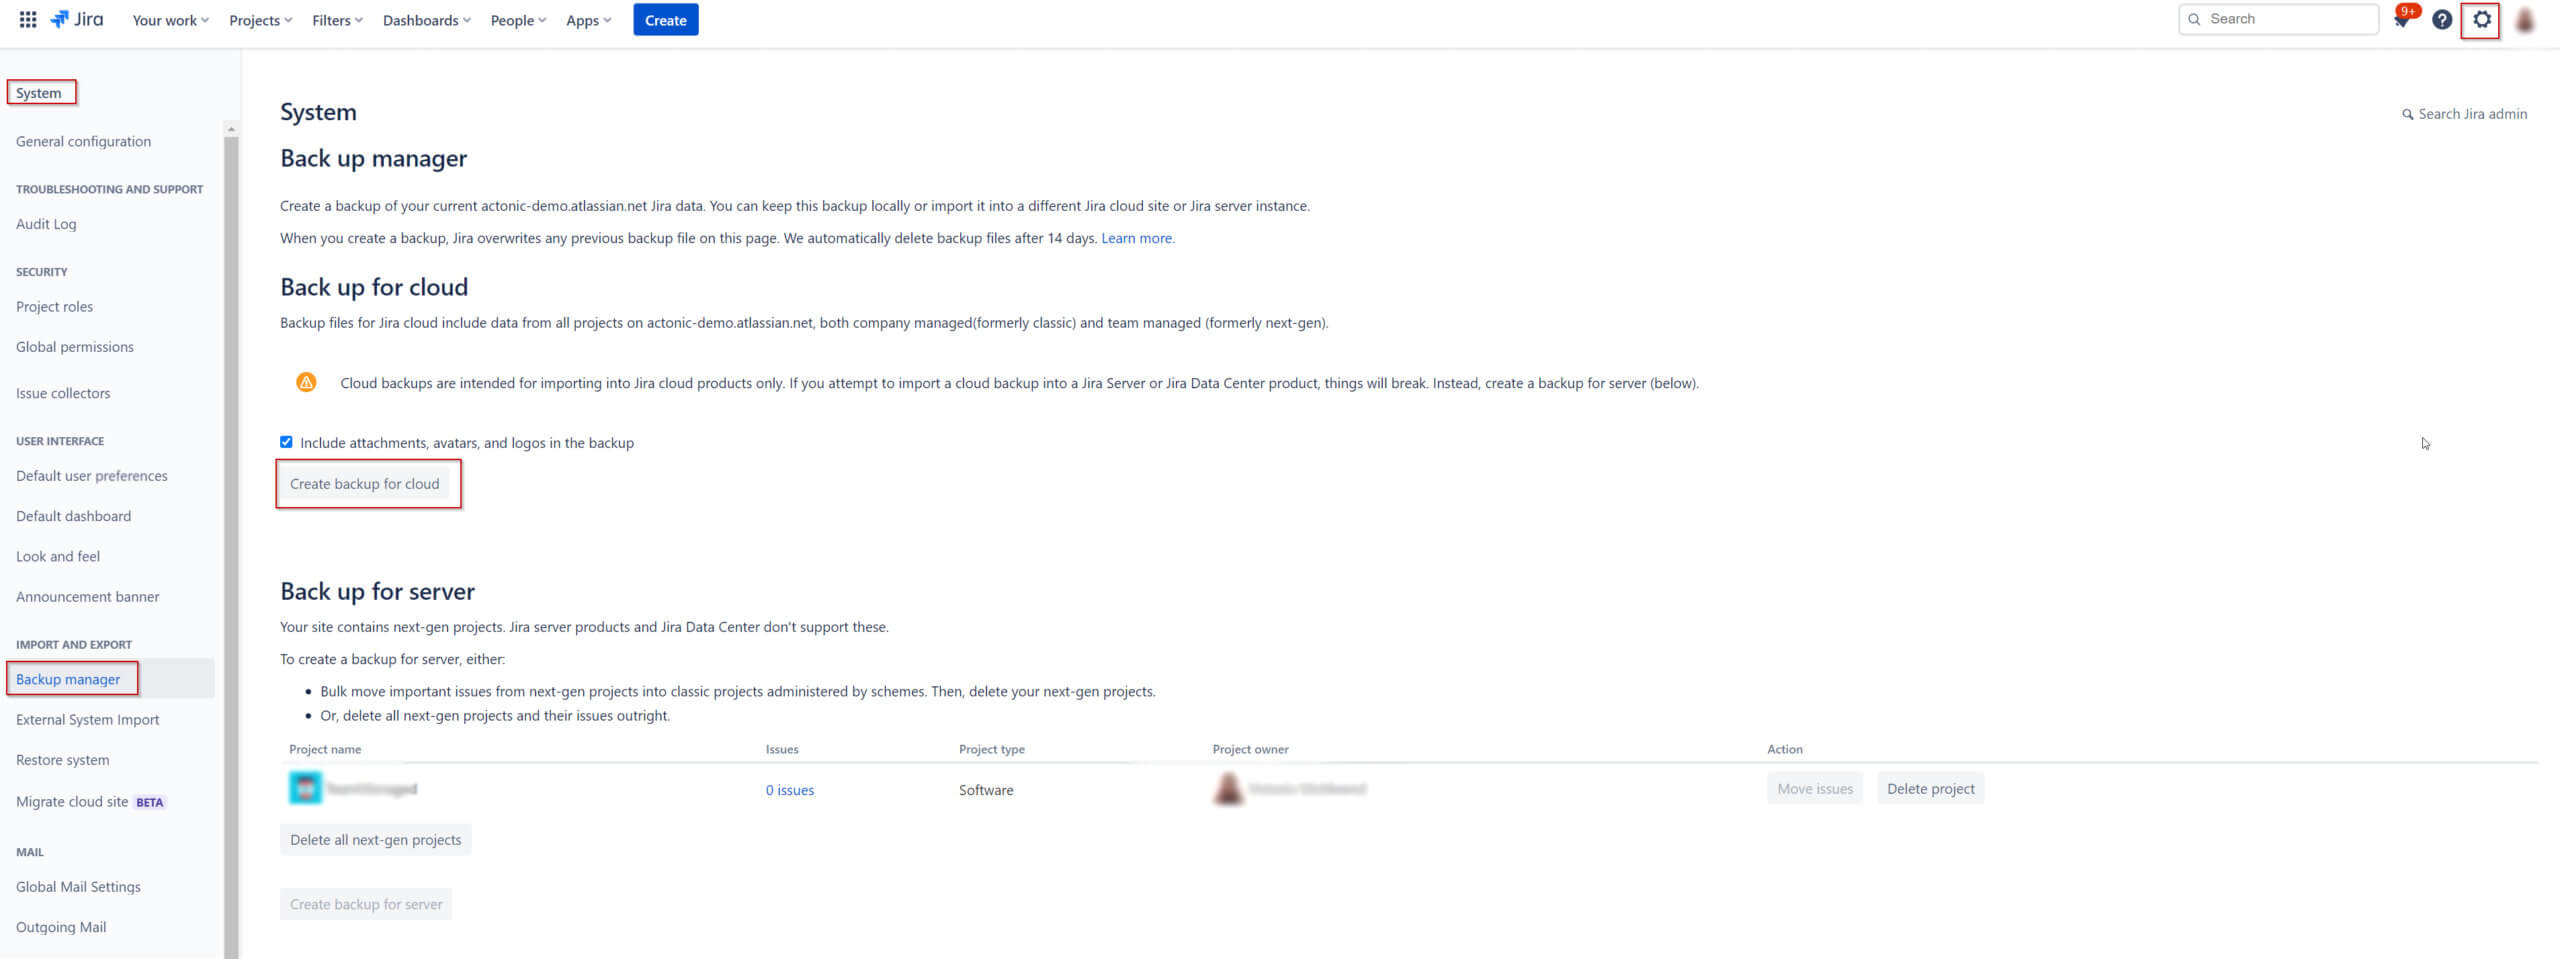
How to create a manual backup in cloud
We have shown you an alternative option for automated backup creation for servers and data centers above. But how can you do a manual backup in Jira Cloud?
You have the option of performing a pure data backup (without attachments, avatars and logos) at any time. A backup containing attachments, avatars and logos can only be created if no further backup with attachments was created in the last 48 hours. Otherwise, you have to wait until the 48 hours have expired.
If you want to create a backup, proceed as follows:
-
You can create a backup of your current Jira data under Settings → “System” → “Back up manager”. You can save your backup locally or import it into another Jira Cloud or server instance. Backup files contain all data from your team and company-managed projects.
Please note that when you create a backup, your previous backup data on this page will be overwritten. In addition, Atlassian automatically deletes your files stored here after 14 days. Cloud backups are only intended for import into Jira cloud products. Errors occur when importing a cloud backup into a Jira server or a Jira data center product. In this case, use a backup for server.
If you have any further questions about backing up your Atlassian instances, please do not hesitate to contact us. We would be happy to support you in creating a backup plan customized to your use cases.


