What is the Xray Test Case Importer?
The Xray Test Case Importer is a wizard of Xray Test Management for Jira that helps you to import tests from CSV or JSON files. In this tutorial, we show you how to easily master the import of CSV files. If you have any questions about importing with JSON, just contact us – we’ll be happy to help!
Generally, you can also import tests via the REST API, but this is time-consuming and requires some preparatory work and knowledge. The Xray Test Case Importer, however, is an intuitive tool that can save you an immense amount of time and reduce the risk of potential pitfalls.
Xray Test Case Importer or Jira CSV Importer?
In Jira, you also have the option of importing CSV data via the CSV Importer integrated in Jira. These two tools are, of course, suitable for different purposes:
You may have already used the Jira CSV Importer to import some tasks. In order to add your predefined tests to your Jira instance, working with the Xray Test Case Importer is unavoidable.
But don’t worry: with these instructions, you will succeed in no time!
Use Xray Test Case Importer for Jira efficiently: Step-by-step guide
Before the import: prepare the CSV file
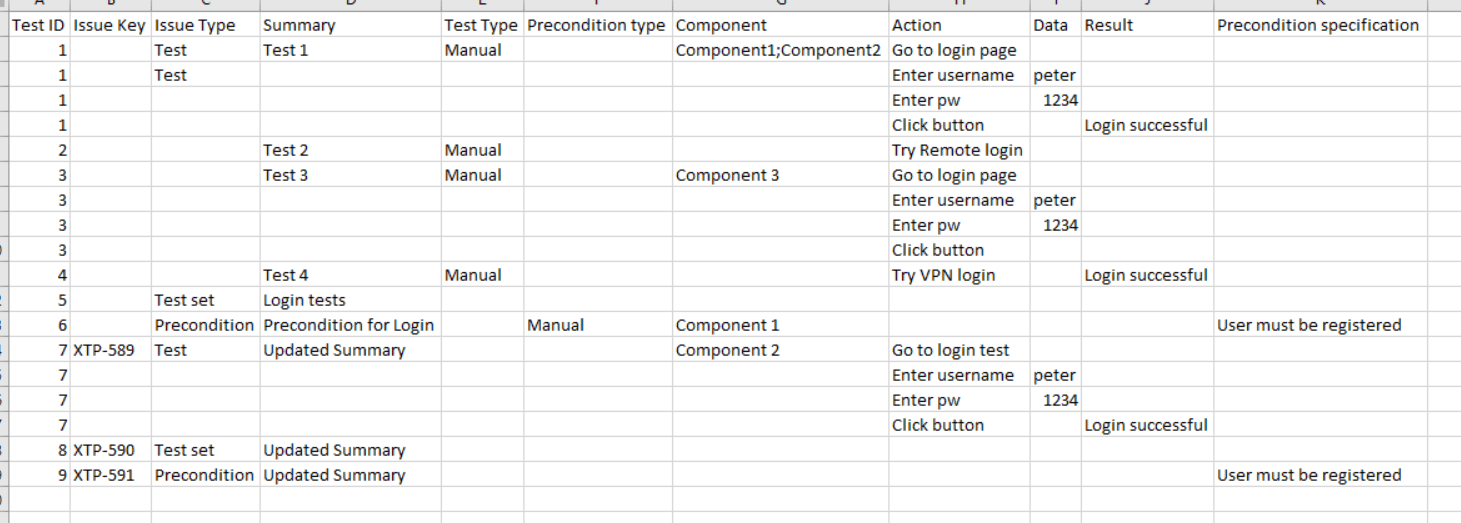
Before the actual task begins, there are a few things to keep in mind with the CSV file. You can name the fields of your file according to your individual wishes, but make sure to include these following three mandatory fields:
-
Test ID: Unique designation for the operation. This can be used to group rows or identify preconditions for test sets.
-
Summary: In Jira, no task can be created without a summary. Since Xray imports the tests as tickets, a summary is also necessary here.
-
Test type: The test type of the test to be imported is defined here. The types are: Manual, Generic and Cucumber.
Our example shows what a well-structured CSV file can look like that meets all the requirements of the Xray Test Case Importer:
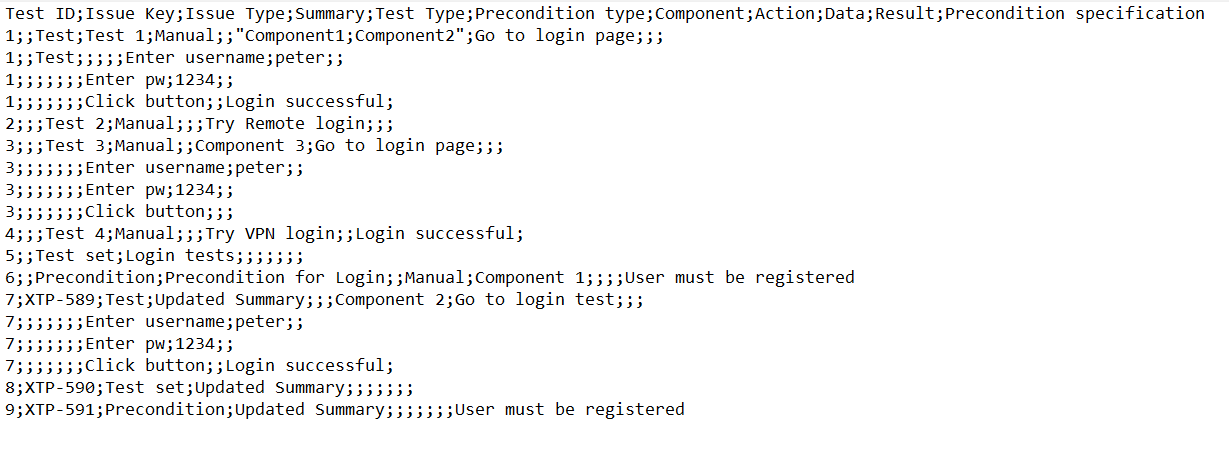
Here, you see the same file displayed in a conventional text editor:
Expert tip: VLOOKUP in Excel
In order to make the CSV file Xray-compliant and to ensure that no time-consuming disturbances occur during import, we recommend that you take a closer look at Excel’s VLOOKUP formula. This is a function that searches columns vertically – hence the name, V stands for vertical.
This formula is very useful, for example, if you want to update an existing issue and assign the keys to the CSV content with little effort.
When exporting your CSV file, make sure to choose a separator that optimally separates field values only. We recommend the semicolon “;”.
The import
Important note on permissions
In order to carry out the import successfully, you need the permission “Perform mass operations” on the one hand and the “Create operations” permission on the other.
Step 1: Open your Jira Dashboard, select the app “Xray” and then the Test Case Importer from the menu.
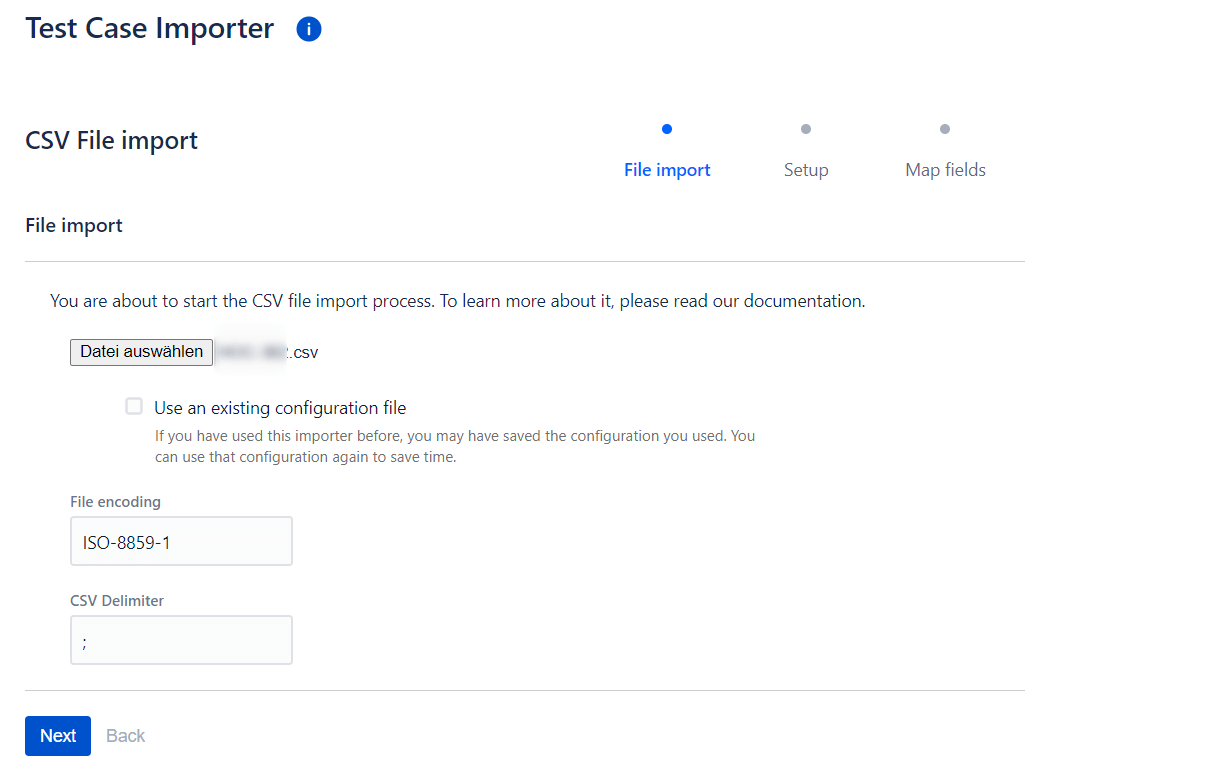
Step 2: After you have decided between JSON and CSV for the import of a CSV file, the following screen appears:
Select your CSV source file and the previously defined separator here. If you do not remember the separator, you can simply look it up in the file by right-clicking on the CSV file → “Open with Editor”.
Usually, it is advisable to use the UTF-8 encoding so that all special characters and umlauts are displayed without errors. However, this is not the case with the Xray Test Case Importer and the format “ISO-8859-1” is necessary to display umlauts correctly, for example.
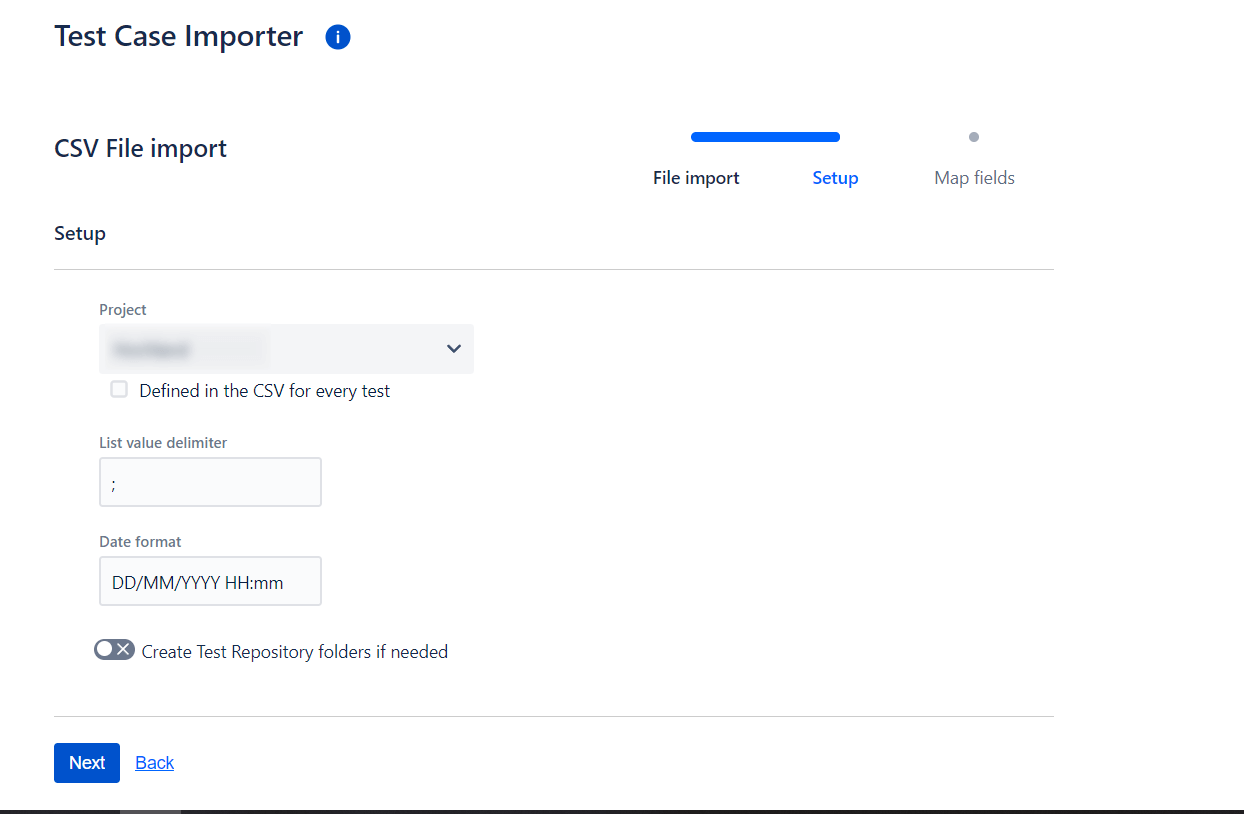
Step 3: Now, you can select additional setup information:
-
Select the project to import into
-
The delimiter format
-
A date format that will be used to analyze the fields: the main thing to match here is the format from the system settings
-
Whether or not the test repository folder should be created automatically
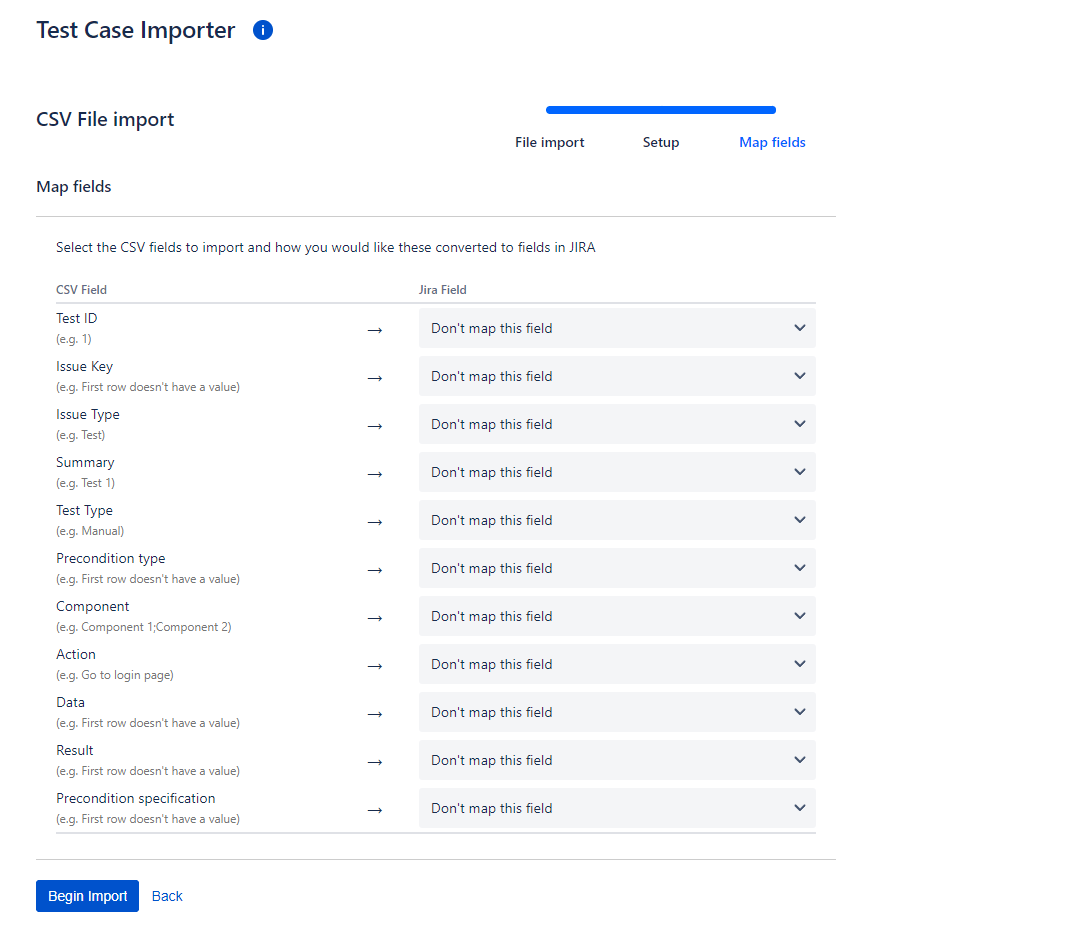
Step 4: You can now determine the assignment of columns to Jira/Xray fields. The default setting for Jira fields is: “Don’t map this field”, as you can see in the next screenshot.
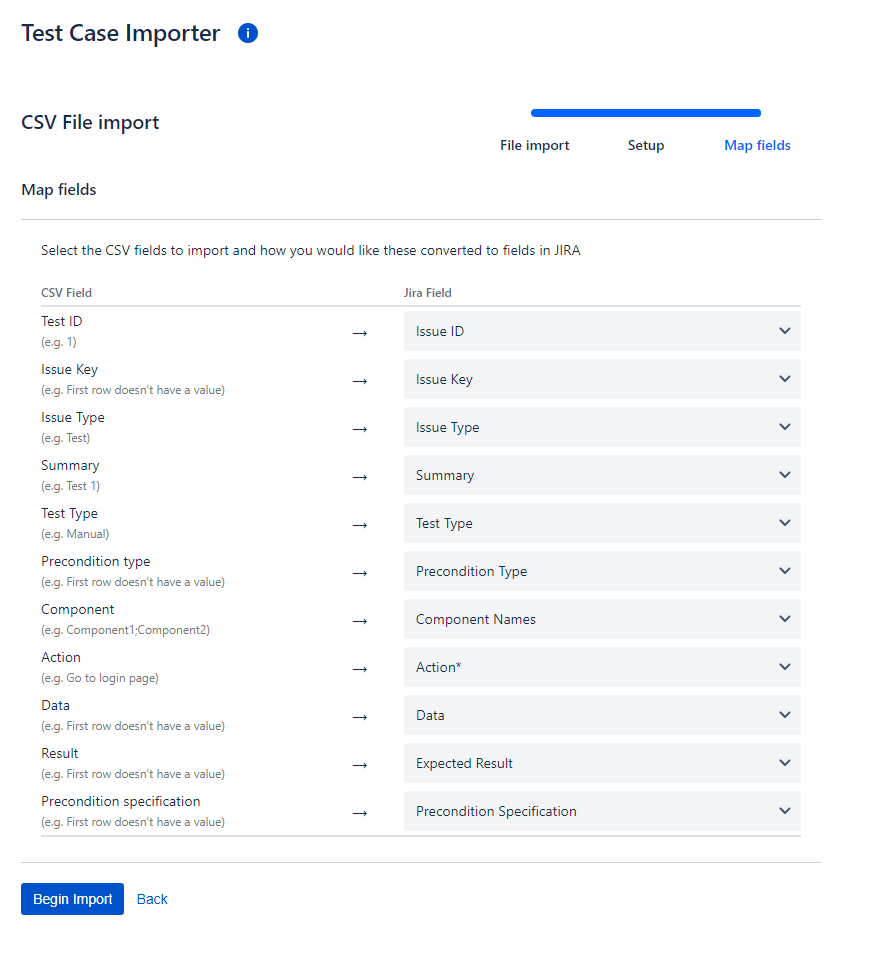
Making the assignments conscientiously is of great advantage for the clarity of your project. Do not forget to assign the fields “Test ID”, “Summary” and “Test Type”, because these are – as already mentioned – mandatory fields.
If you have defined other mandatory fields in the Issue Type Test in your Jira project, an assignment must also be specified for these.
A possible assignment could look like this:
Then click on “Begin Import” to start the process.
Step 5: During the process, you can track how far the import has progressed.
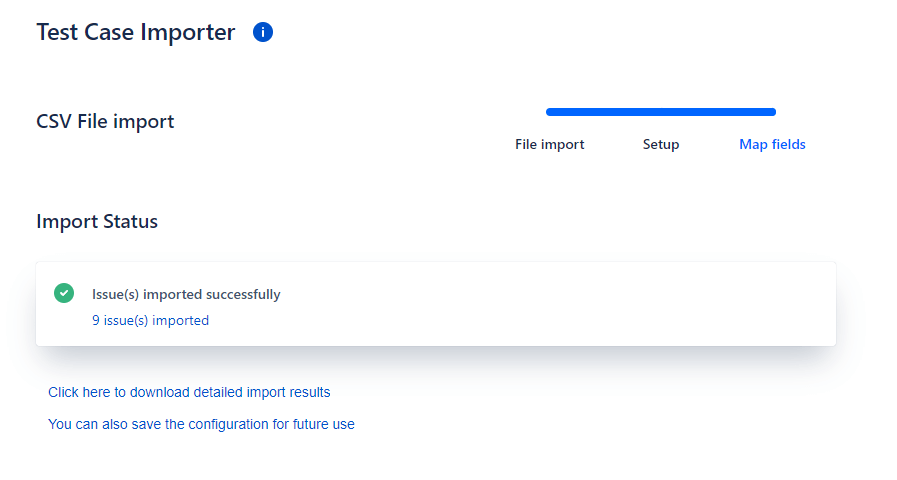
Step 6: A successful import gives you a screen that looks similar to this
After the import
After the import process is complete, you can display a list of results and, if necessary, edit or save them in order to insert the imported tasks into a test set, for example.
Tests that are to be removed from the project again can simply be deleted via Bulk Change.
You can also check whether all imports have been successfully completed. If not, click on “Click here to download detailed import results”. The JSON file there will then explain where the error was. Then, correct the errors in the CSV file.
Conclusion
This practical guide has shown you how to efficiently import multiple test cases at the same time using the Xray Test Case Importer. One advantage of this method compared to the Jira CSV Importer is that the tool is designed for tests and is intuitive to use.
This way, you can quickly import a large amount of tests into your instance without a high risk of errors. Our consultant tips for uncomplicated test import ensure your success.
If you would like to receive further tips, need support with a migration or want to know how the import works with JSON, simply contact our consultants.

