Why sync 2 or more Jira instances?
There are many scenarios where syncing 2 Jiras can be useful. So, here are 2 examples:
-
Your developers might use Jira to track bugs, while your support team uses their own Jira instance to monitor customer issues. The support team wants to know when issues are fixed, and the developers want to know what issues customers are experiencing. An integration can share this data automatically, syncing the fields that each team needs.
-
If you run a business that subcontracts deliveries, then the delivery company needs your customer data to do their job. You would like to know when products are delivered, and if there are any problems. Integrating Jira instances can connect both your systems, sharing exactly what you need without manual intervention.
Choose the right solution first
To integrate Jira instances successfully, you need the right tool.
The tool introduced today is called Exalate. Exalate is designed to provide complete flexibility, giving you full and secure control over what is shared, and when synchronization takes place.
How to integrate multiple Jira instances in 5 steps
Here’s how to set up the Jira sync, using Exalate.
Step 1: Install Exalate on Jira
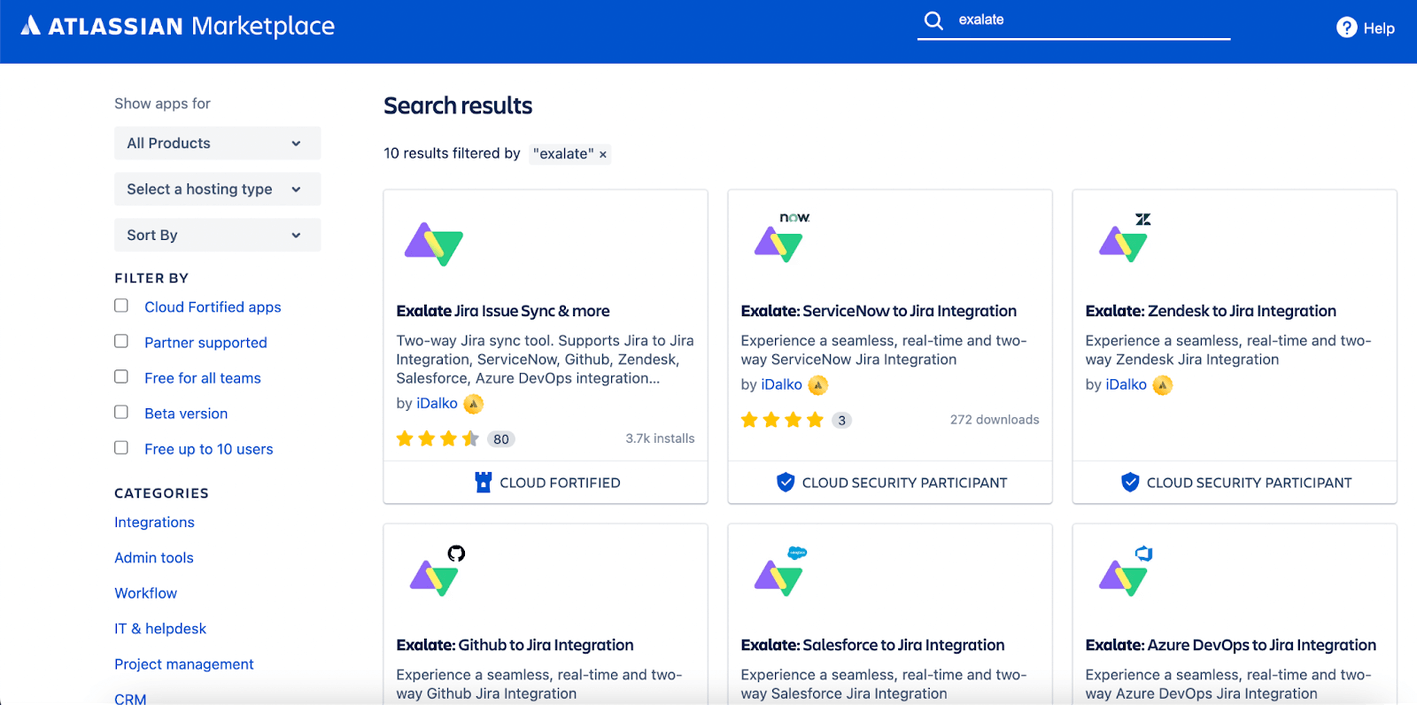
First, you need to install Exalate. You’ll need to repeat this step on both your Jira instances. You can find Exalate in the Atlassian marketplace, accessible by clicking your user icon in Jira.
Type “Exalate” in the marketplace search field. Find “Exalate Jira Issue Sync & more”. Click the free trial button, then “Get license”.
Choose whether you’re using Jira Cloud, Server, or Data Center. Then provide your site’s address.
Next, you’ll be redirected back to your Jira dashboard. Confirm your free trial, and you’re ready to go.
Step 2: Connect the Jira instances
Now you need to create a connection between the two instances. With Exalate installed, you can find its menu on the left, under “Manage Apps” on Jira’s administration screen.
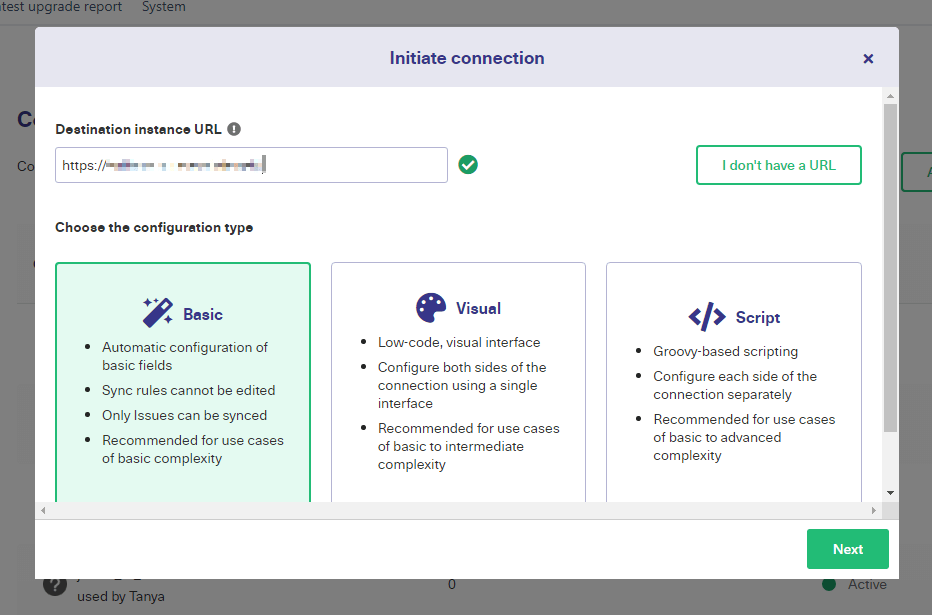
Click “Connections” in the Exalate menu, then click “Initiate Connection”.
Enter the URL of the other Jira instance in the popup.
When connecting to a different instance, select your connection type, and then pick a configuration mode.
You can also put in the URL of the same instance here to connect projects on the same system. In that case, you can immediately select a configuration type.
Exalate gives you 3 options:
-
Basic mode is included with the free plan. It picks sensible defaults for you and lets you synchronize up to 1000 items per month.
-
Visual mode gives you a low-code visual interface to configure your connection with.
-
Script mode lets you define sync rules using the ‘Groovy’ scripting language. It’s powerful, and lets you create advanced rules for item mappings and triggers.
You also have to give the connection a name, and a description. That’s useful when you have multiple connections.
Pick the project you want to sync, click “Initiate” and Exalate will create the connection for you. To access the next steps, click “configure sync” right away, or, later, find your connection in the connections screen, and click the “Edit connection” icon.
The synchronization maps fields from entities on one instance to entities on the other. Usually, this is just a direct mapping, but you can change this.
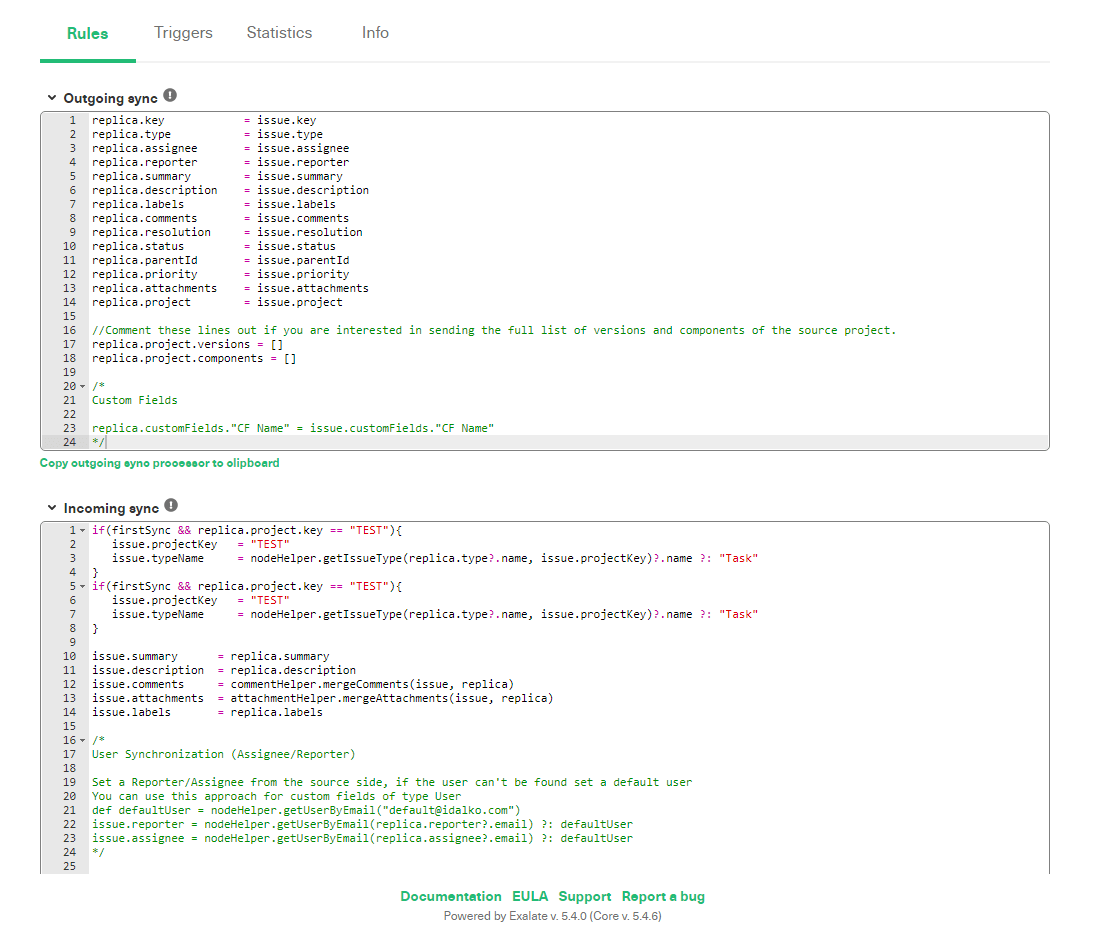
On the “Rules” tab, there is a list of rules controlling what is mapped to what.
The outgoing sync rules control how fields on your system are sent to the other instance. The incoming rules control how fields on entities your instance receives are mapped to the equivalent entities on your system.
You can change these rules to map to different fields.
You can delete them, or comment them to prevent them from being applied. Furthermore, you could add specific values. For example, you could change issue.description = replica.description to read issue.description = ‘from external team’.
Sync rules allow you to share precisely what you want and allow you to customize the integration to do what you need.
Step 4: Automated Synchronization Triggers
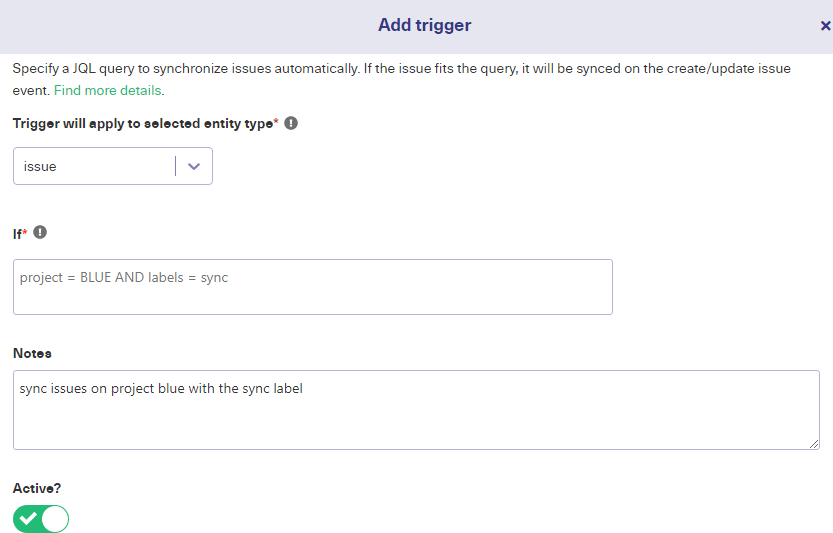
Triggers set the conditions for syncing entities. Entities that match the conditions are synced. To create one, select the “Triggers” tab and click “Create trigger”.
On the popup that appears, you need to select the entity type the trigger applies to. You can also write a JQL expression that matches what you want to sync.
For example:
project = BLUE AND labels = sync
Will synchronize entities that match both those conditions.
After the code, you can add a description to make it clear what the trigger is for. There’s also a switch to activate and deactivate the trigger.
You can create as many triggers as you require and can enable, disable and delete them as required.
Step 5: Start synchronizing
Now that your connection is ready, you can sit back and watch it do the work for you. When first setting it up, you should test it to make sure it is doing what you need. If not, check for typos in your sync and trigger rules.
Once you’ve verified that it is working, you’re done.
Conclusion
An integration makes sharing data much easier, and gives you a level of control that would be impossible using other methods. And it isn’t hard to set up. With Exalate you can be ready in minutes. You can also tweak it as much as you want to match your exact requirements thanks to scripts.
By using multiple triggers and customizing the sync rules, you can create an advanced system for data exchange that connects your teams’ software automatically and helps you work together.
It’s fast, easy, and helps you maximize the benefit you get from your data.
It has a 30-day free trial, and you can book a demo with the vendor if you want to find out how Exalate is tailored to your specific use case.
