User mapping in Jira - How to quickly map user data from one user directory to another - Actonic – Unfolding your potential
We have outsourced our Atlassian licensing and services business to the newly founded Seibert Solutions GmbH. Actonic's products will be further developed under the usual name.

User mapping in Jira – How to quickly map user data from one user directory to another


5
(1)

For example from internal directory to Microsoft Active Directory

In addition to the internal Jira Directory, where data gets saved in the Jira internal database, many companies who are using Jira embed a Microsoft Active Directory (AD) or Azure Active Directory. This could be a very useful step, but without thoughtful planning it can lead to a real data clutter!

Through this guide, users whose accounts were created on the internal Jira directory get a new account in the active directory. It often happens that the new account gets created with the same log-in data as the old one, which leads to two identically looking accounts. During the login process, it could now happen that the user chooses the obsolete, identically looking old account and works on Jira issues with this one. The data that should be related to the new account is now assigned to the old one, and unnecessary data chaos occurs. In this article, we will give you a practical step-by-step guide that will enable you to map this data of the different accounts without big administrative time and effort. You will be able to tidy up this data clutter very quickly.

A scenario

The Jira user accounts of a company have always been created through the internal directory of Jira. For this reason, the users always have logged in and worked on tasks with the account that was created in that directory. Now the company decides to establish an active directory for Jira. Because of that, the company creates new accounts for its users in the active directory. With the creation process in the LDAP, some accounts have been created with the same username and the same e-mail address as in the internal Jira directory. Jira gives priority to the internal directory and so the old account is still active, and the users can log in and continue to create content with the old, now obsolete internal directory user. That’s why users still log in with the wrong, old account and create content with that. Now we are also using twice as many user licenses in Jira, because we now have one internal directory user and one active directory user.

Now the company sets its own LDAP in order for the users to log in with the new active directory account. The data that was unknowingly created with the old Jira internal account can now be watched with the company active directory account, but couldn’t be edited any more because of missing permissions. That’s why the company searches for a way to bundle all data of their user accounts in the active directory, which will help the users to process their data in one single place.

Our smart solution

Actonic has developed the app “GDPR (DSGVO) and Security for Jira”. The app is primarily used for data privacy compliance in Jira (for Server and Data Center) but it can also be used to transfer data from one user to another and/or to anonymize data. Furthermore, we will explain to you how to merge the data of two accounts into one.

A practical guide

To start the process, install “GDPR (DSGVO) and Security for Jira” (for Server or data center). Navigate to the “Manage apps” section of the app and select the data-cleaner function. Click on the „Anonymize Users” field.

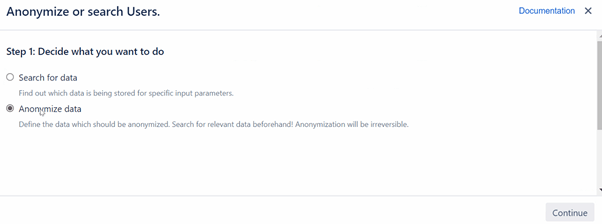
Step 1

Choose “Anonymize data“ and click on continue.

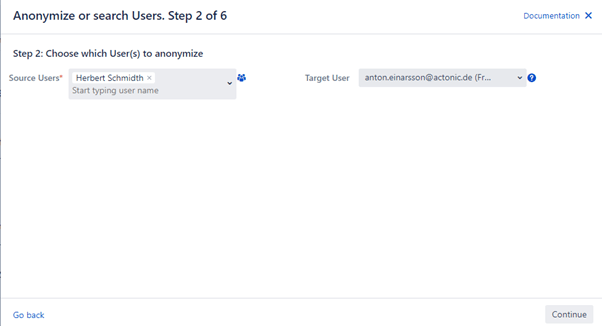
Step 2

User mapping: Choose a “Source User” from whom the data gets collected and a “Target User” to whom the data should be transferred. You can choose multiple “Source Users” too. Click on continue for the next step.

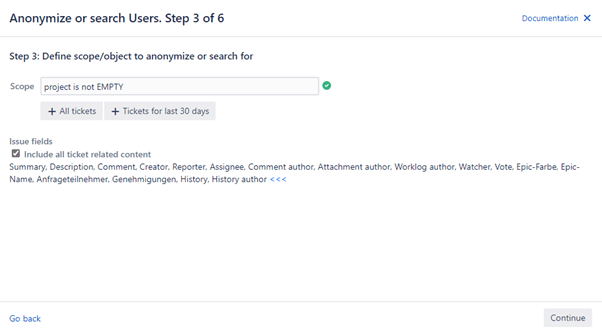
Step 3

Here is where we specify the scope for the data to be transferred. You can use your own JQL to delimit the data that should be assigned to the other account. Of course, you can choose all data of a user by selecting “All Tickets”. Alternatively, you can limit the data transfer exclusively on the last thirty days.

You should note that through this process just superficial data gets chosen. To transfer all ticket related data, you have to choose the checkbox “Include all ticket related content“. By selecting this option, every piece of information that is included in the ticket will be transferred.

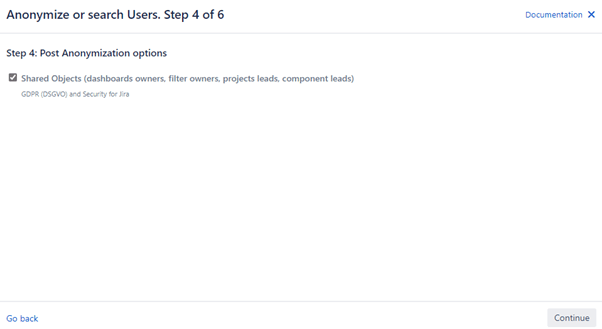
Step 4

Set a checkmark here if the filters that were created by the “Source User” and additional data should be transferred too.

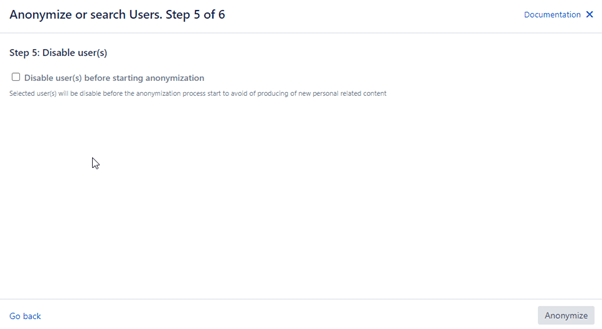
Step 5

Here, you can choose if the “Source User” should be deactivated. By activating this functionality, you prevent the “Source User” from creating new content.

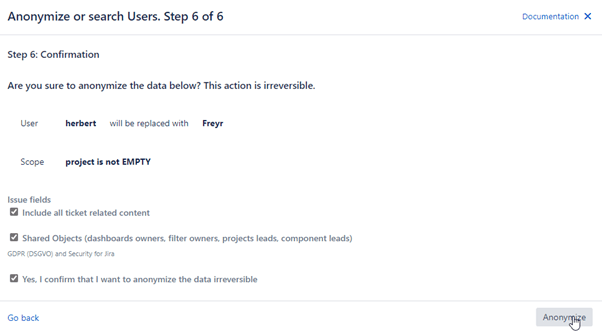
Step 6

In the last step, you get an overview of the chosen options. These have to be confirmed first.

Click here on “Anonymize” to map all chosen information from the „Source User“ to the „Target User“.

This is how easy user mapping in Jira can be! Our app “GDPR (DSGVO) and Security for Jira” offers you many useful functions beyond user mapping that will simplify your work with Jira immensely.

In the Atlassian world, data privacy is a big issue that results in challenges for many companies. Our app is the data protection toolkit that enables you to find and clear up critical or non-compliant data. Furthermore, you can create data rules with our app that will enable you to never miss personal data that should be handled carefully or be deleted.

Interested? Check out our app in a 30-days free trial!

CCPA, GDPR, HIPAA and more: easily manage all of them!

  • Handle all sensitive and personal data
  • Be safe with risk-free data protection
  • Also ready for: CCPA, HIPAA, LGPD, etc.
Go to Atlassian Marketplace

How useful was this post?

Click on a star to rate it!

Average rating 5 / 5. Vote count: 1

No votes so far! Be the first to rate this post.